Archive
Now Available: Virtual Machine Manager 2016 book

VMM 2016 book
Virtual Machine Manager (VMM) 2016 is part of the System Center suite to configure and manage private clouds.
Now available: System Center 2016 Virtual Machine Manager Cookbook – Third Edition
The book will be your best companion for day-to-day virtualization needs within your organization, as it takes you through a series of recipes to simplify and plan a highly scalable and available virtual infrastructure. You will learn the deployment tips, techniques, and solutions designed to show users how to improve VMM 2016 in a real-world scenario. The chapters are divided in a way that will allow you to implement the VMM 2016 and additional solutions required to effectively manage and monitor your fabrics and clouds. We will cover the most important new features in VMM 2016 across networking, storage, and compute, including brand new Guarded Fabric, Shielded VMs and Storage Spaces Direct. The recipes in the book provide step-by-step instructions giving you the simplest way to dive into VMM fabric concepts, private cloud, and integration with external solutions such as VMware, Operations Manager, and the Windows Azure Pack.

By the end of this book, you will be armed with the knowledge you require to start designing and implementing virtual infrastructures in VMM 2016.
The book has been updated to reflect the updates available on VMM 2016 1801 release.
What You Will Learn
- Plan and design a VMM architecture for real-world deployment
- Configure fabric resources, including compute, networking, and storage
- Create and manage Storage Spaces Direct clusters in VMM
- Configure Guarded Fabric with Shielded VMs
- Create and deploy virtual machine templates and multi-tier services
- Manage Hyper-V and VMware environments from VMM
- Enhance monitoring and management capabilities
- Upgrade to VMM 2016 from previous versions
Authors
Key features of the new Microsoft Azure Site Recovery Deployment Planner
Azure Site Recovery Deployment Planner is now GA with support for both Hyper-V and VMware.
Disaster Recovery cost to Azure is now added in the report. It gives compute, storage, network and Azure Site Recovery license cost per VM.
ASR Deployment Planner does a deep, ASR-specific assessment of your on-premises environment. It provides recommendations that are required by Azure Site Recovery for successful DR operations such as replication, failover, and DR-Drill of your VMware or Hyper-V virtual machines.
Also, if you intend to migrate your on-premises workloads to Azure, use Azure Migrate for migration planning. Azure Migrate assesses on-premises workloads and provides guidance
Key features of the tool are:
- Estimated Network bandwidth required for initial replication(IR) and delta replication.
- Storage type(standard or premium storage) requirement for each VM.
- Total number of standard and premium storage accounts to be provisioned.
- For VMware, it provides the required number of Configuration Server and Process Server to be deployed on on-prem.
- For Hyper-V, it provides additional storage requirements on on-premises.
- For Hyper-V, the number of VMs that can be protected in parallel (in a batch) and protection order of each batch for successful initial replication.
- For VMware, the number of VMs that can be protected in parallel to complete initial replication in a given time.
- Throughput that ASR can get from on-premises to Azure.
- VM eligibility assessment based on number of disks, size of the disk and IOPS, OS type.
- Estimate DR cost for the target Azure region in the specific currency.
When to use ASR Deployment Planner and Azure Migrate?
- DR from VMware/Hyper-V to Azure
- Migration from VMware to Azure
Download the tool and learn more about VMware to Azure Deployment Planner and Hyper-V to Azure Deployment planner.
New Technical Preview for Microsoft Windows Server management experience Project “Honolulu”, released
Modernized, simplified, integrated, and secure experiences. Project “Honolulu” Technical Preview 1711 update is now available!
Some cool new features were release like the Windows 10 client management: You can now add Windows 10 client machines as connections in Honolulu, and manage them with a subset of tools in the “Computer Management” Solution.
For more information on new and removed features check https://blogs.technet.microsoft.com/windowsserver/2017/12/01/1711-update-to-project-honolulu-technical-preview-is-now-available/
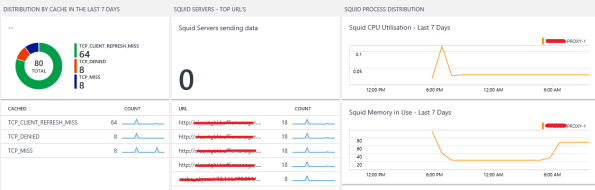
Extending Microsoft OMS to monitor Squid Proxy running in Linux with a plugin – part 1/3 #MSOMS
Since Microsoft released OMS, I have been an early adopter and evangelist for the solution. Not only it is simple to deploy but it gives you a full spectrum of many of the workloads you have either on-premises or in the cloud and it does not matter which cloud. Be it Azure, AWS, Google and many others.
So, as I was advising on OMS for a customer, I found that they were running Squid Proxy servers. The Squid proxy server is one of the most famous proxy servers in the world and it has been utilised for years in many organisations. For that reason I then I decided to look at how OMS could leverage the monitoring for Squid.

As you can see here: https://github.com/Microsoft/OMS-Agent-for-Linux/tree/master/installer/conf/omsagent.d there are already many plugins for OMS to monitor Windows and many Linux OS as well, DNS, Network, SQL, MySQL, Postgree, VMware, MongoDB, Security, Audit, Change Tracking and so on.
But, there was no Squid plugin and that’s where I brought back my past years of experience as a developer and although that was a long, long time go, I was able to developer in ruby a Squid plugin for Microsoft OMS.
How I developed it?
PART 1 : LOG Files
- I started but investigating the squid log on /var/log/squid/access.log and then I research REGEX expressions to extract information out of it. Below is a extract of it
1479696836.902 134 10.1.1.4 TCP_MISS/301 488 open http://cnn.com/ – HIER_DIRECT/151.101.0.73 –
1479696848.110 242 10.1.1.4 TCP_MISS/400 486 open http://www.sydney.com/ – HIER_DIRECT/54.253.253.77 text/html
1479696860.004 407 10.1.1.4 TCP_MISS/301 636 open http://www.7news.com.au/ – HIER_DIRECT/203.84.217.229 text/html
The initial difficult part for me was of to decouple the date/time to get it on a human readable format. So, after long hours of research and playing along, I decided for the following REGEX :
- I then wrote a squidparserlog.rb in ruby to parse the Squid access.log file and turn it into a OMS format
class SquidLogParserLib
require ‘date’
require ‘etc’
require_relative ‘oms_common’
require ‘fluent/parser’def initialize(error_handler)
@error_handler = error_handler
endREGEX =/(?<eventtime>(\d+))\.\d+\s+(?<duration>(\d+))\s+(?<sourceip>(\d+\.\d+\.\d+\.\d+))\s+(?<cache>(\w+))\/(?<status>(\d+))\s+(?<bytes>(\d+)\s+)(?<response>(\w+)\s+)(?<url>([^\s]+))\s+(?<user>(\w+|\-))\s+(?<method>(\S+.\S+))/def parse(line)data = {}
time = Time.now.to_fbegin
REGEX.match(line) { |match|
data[‘Host’] = OMS::Common.get_hostnametimestamp = Time.at( match[‘eventtime’].to_i() )
data[‘EventTime’] = OMS::Common.format_time(timestamp)
data[‘EventDate’] = timestamp.strftime( ‘%Y-%m-%d’ )
data[‘Duration’] = match[‘duration’].to_i()
data[‘SourceIP’] = match[‘sourceip’]
data[‘cache’] = match[‘cache’]
data[‘status’] = match[‘status’]
data[‘bytes’] = match[‘bytes’].to_i()
data[‘httpresponse’] = match[‘response’]
data[‘bytes’] = match[‘bytes’].to_i()
data[‘url’] = match[‘url’]
data[‘user’] = match[‘user’]
data[‘method’] = match[‘method’]}
rescue => e
@error_handler.logerror(“Unable to parse the line #{e}”)
endreturn time, data
end #defend #class
<source>
type tail
format SquidLogParser
path /var/log/squid/access.log
pos_file /var/opt/microsoft/omsagent/state/var_log_squid_access.pos
tag oms.api.Squid
log_level error
</source>

On my next article I will go through the next part, which is getting Squid Proxy Statistics in OMS, along with the full code.
Linux Bash Command Line natively on Windows 10
If you a Linux fan or like to play around with Linux or are experienced Linux, Mac OS X or Unix developer, this feature is perfect for you: the new Bash feature will give you a Linux root shell, which means that you won’t even need to use sudo to become “Administrator”. As root user you will have full system access, like you have in Linux and Unix systems.

Before we start, is important to understand that an application that you install in the Bash shell is restricted to Bash shell. You won’t be able to access the application from PowerShell, Cmd or Explorer in Windows.
The solution
To offer a full Bash shell based on Ubuntu, Microsoft worked with Canonical to provide a shell that runs atop the subsystem allowing you to run the Bash shell and the exact same binaries you’d normally run on Ubuntu Linux.
There are some limitations as you won’t be able to install Linux server applications or to start Linux graphical software. The target for the feature are developers who want to run Linux command-line utilities on Windows.
Requirements
- Windows 10 Insider Preview Build (minimum build: 14316)
- Developer Mode activated
Getting there in simple 10 steps
1. Click on Windows Start, click on Settings and then click on Update & Security
2. On the left menu, click on Windows Update, then click on Advance Options
3. On the Advanced Options window, if you are not already an Windows Insider, click on Get Started and follow the instructions to become an Windows Insider. You will be requested to restart your computer and after that, return to this same windows and select the Fast mode to have at least the 14316 build installed.

4. Once the computer have the required minimum build, go back to Update & Security and on the left menu select For Developers.

- On Windows Start, type Program and Features

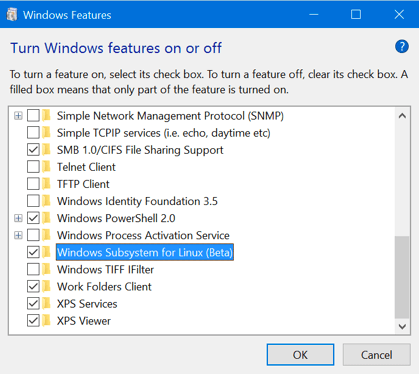
6. On the left panel, click on Turn Windows Feature on or off

7. Select Windows Subsystem for Linux (Beta) from the list and click on OK. You’ll be requested to restart your computer, for the feature to get installed.
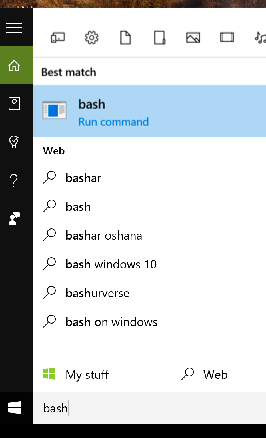
8. When you computer gets back, click on the Windows Start button and type bash then select the bash command or press enter.
9. You will be requested to accept the terms of license and after accepting it a bash window will open. Press Y to accept the download of the Bash Ubuntu on Windows application from the Windows Store.
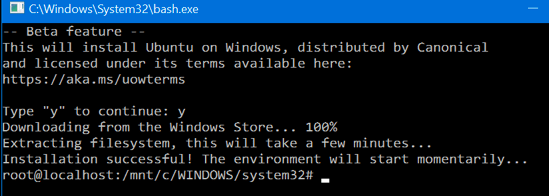
10. That’s it. You now have a full command-line bash shell based on Linux Ubuntu. You now have access to all the Linux command line software.
Note: As we installed the bash for Ubuntu and because they’re the same binaries as you would have on a normal Linux Ubuntu installation, you can use the same apt-get command you used to run on Ubuntu, to install software from Ubuntu’s repositories.
Notes:
- In Linux the Bash shell is case-sensitive and the
- Windows file system is located at /mnt/c in the Bash shell environment.
If you find that Microsoft is helping you and your business as I as do, please help me out by recommending it on Recomazing a new tech platform where socially connected networks store and share trusted recommendations. Please click here to help our community.
Have Fun!!!
Shielded VM’s: Virtualization security is a major investment area in Hyper-V 2016
 SECURITY – Protecting the company data should be a priority.
Protecting a Virtual Machine(VM) guest from a possible host compromised as well as the certain that on a 3rd party hosting environment your VM will be protected in addition to the protection applied to the hosts is a major investment area in Hyper-V 2016.
If you find that Microsoft is helping you and your business and find it has amazing technologies as I as do, please help me out by recommending it on Recomazing a new tech platform where socially connected networks store and share trusted recommendations. Please click here to help our community.
Taking into consideration that a VM is a file, stored somewhere on a storage on locally in the Hyper-v host, it needs to be protected from attacks to the storage system, the network, while it is backed up or taken or copied to other systems.
To help protect against compromised fabric, Windows Server 2016 Hyper-V introduces Shielded VMs. A Shielded VM, requires a VM to be created as generation 2, which has a virtual TPM, is encrypted using BitLocker and can only run on healthy and approved hosts in the fabric. So, if someone copy either maliciously or accidentally the VM to a non-approved host, the VM (which is encrypted), won’t start and cannot be used to be mounted to allow access to it’s file system.
Shielded VM’s use several features to make it harder for Host administrators and malware on the host to inspect, tamper with, or steal data from the state of a shielded virtual machine. Data and state is encrypted, Hyper-V administrators can’t see the video output and disks, and the virtual machines can be restricted to run only on known, healthy hosts, as determined by a Host Guardian Server.
A configured Shielded VM has:
- BitLocker encrypted disks
- A hardened VM worker process (VMWP) that helps prevent inspection and tampering
- Automatically encrypted live migration traffic as well as encryption of its runtime state file, saved state, checkpoints and even Hyper-V Replica files (from 2016 TP5)
- Blocked console access
- Blocked PowerShell Direct
- Blocked Guest File Copy Integration Components
- Blocked services that provide possible paths from a user or process with administrative privileges to the VM.

Image Source: Microsoft – https://technet.microsoft.com/en-us/library/mt599611.aspx
With the release of Windows Server 2016 TP5, the Hyper-V team at Microsoft made shielded virtual machines compatible with Hyper-V Replica. As with copying/moving the VM, to replicate a shielded VM, the host you want to replicate to must be authorized to run that shielded VM.
The Host Guardian Service supports two different deployments of a Guarded fabric (attestation modes): TPM-trusted attestation (Hardware based) and Admin-trusted attestation (AD based).
I hope you walk away with a better understanding of the Hyper-V Shielded VM solution from this post.
Hyper-V 2016 Tp5: Hyper-V Manager Console new features
Here are some important information and improvements Microsoft released for Hyper-V Manager in Tp5:
- Alternate credentials support. You can now use a different set of credentials in Hyper-V Manager when you connect to another Windows Server 2016 TP5 or Windows 10 remote host. You can also save these credentials to make it easier to log on again.
- Previous version management: the New Hyper-V Manager will allow you to manage versions manage computers running Hyper-V on Windows Server 2012/R2 and Windows 8.x client version.
- Updated management protocol – Hyper-V Manager has been updated to communicate with remote Hyper-V hosts using the WS-MAN protocol, which permits CredSSP, Kerberos or NTLM authentication. When you use CredSSP to connect to a remote Hyper-V host, you can do a live migration without enabling constrained delegation in Active Directory. The WS-MAN-based infrastructure also makes it easier to enable a host for remote management. WS-MAN connects over port 80, which is open by default.
- No more Integration services for Windows Virtual Machines. Updates to integration services for Windows guests are distributed through Windows Update. For service providers and hosting companies, this puts the control of applying updates into the hands of the tenants who own the virtual machines. Customers (tenants Administrators) can now update their Windows virtual machines with all updates, including the integration services, using a single method.
- Integration services for Linux and FreeBSD Virtual Machines. Hyper-V supports both emulated and Hyper-V-specific devices for Linux and FreeBSD virtual machines. Linux Integration Services (LIS) or FreeBSD Integration Services (BIS) , the collection of drivers that are required to run Hyper-V-specific devices, has been added to the Linux kernel and is updated for new releases, but Linux distributions based on older kernels may not have the latest enhancements or fixes. Microsoft provides a download containing installable LIS drivers for some Linux installations based on these older kernels.
Note: As some Linux distributions include versions of LIS, make sure you install the latest downloadable version of LIS, if applicable, for your installation.
Download:
- Download Windows Server 2016 Technical Prevew from the Evaluation Center.
- Download Microsoft Hyper-V Server 2016 Technical Prevew from the Evaluation Center.
Hyper-V. CSV Volumes pause states 5120: Workaround
Microsoft is aware that after installing KB3126593 (MS16-014) there may be an issue that causes loss of network packets.
This may cause Cluster Shared Volumes (CSV) on the nodes Failover Clusters to going into a paused state with an event ID 5120 in the System event log what indicates “Status c000020c – STATUS_CONNECTION_DISCONNECTED”.
You will also find that, on the node that owns the CSV volume(s), there will be an event 7031 with the source: “Service Control Manager”, which indicates “The Windows Firewall Service terminated unexpectedly”.
Troubleshooting Cluster Shared Volume Auto-Pauses – Event 5120. https://blogs.msdn.microsoft.com/clustering/2014/12/08/troubleshooting-cluster-shared-volume-auto-pauses-event-5120/
Microsoft is aware of this problem and are working on a fix. But until it is release here is what you could do to get around this issue:
Option 1: Disable the Firewall LOGGING for all profiles (domain, private, public). (just the logging, not the firewall . You don’t want to be un-protected)
1. Start the Windows Firewall with Advanced Security management console (wf.msc)
2. Right-click Windows Firewall with Advanced Security on Local Computer and select Properties
3. For all profiles (Domain, Private, Public), under Logging, click Customize. Set Log Dropped Packets and Log Successful connections to NO.
Option 2. Uninstall https://support.microsoft.com/en-us/kb/3126593 from the systems.
I will post an update once Microsoft releases the Hotfix.
Azure Automation: Calling a PowerShell from a WebApp
I am working on a project that requires an Azure PowerShell to be called from a WebApp. Without entering in the details of the app, I faced a problem when writing the PowerShell script when it came to the authentication and running the PowerShell script from the Azure Automation portal is not my scenario.
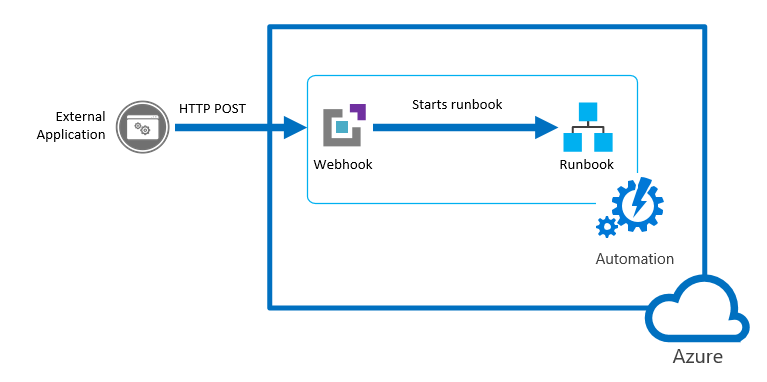
Automation: The figure shows an External App calling a Microsoft Azure Webhook to starts a runbook
Before I start, let’s have a look on the authentication Methods. The following table summarizes the different authentication methods for each environment supported by Azure Automation and the article describing how to setup authentication for your runbooks.
| Method | Environment | Article |
| Azure AD User Account | Azure Resource Manager and Azure Service Management | Authenticate Runbooks with Azure AD User account |
| Azure AD Service Principal object | Azure Resource Manager | Authenticate Runbooks with Azure Run As account |
| Windows Authentication | On-Premises Datacenter | Authenticate Runbooks for Hybrid Runbook Workers |
| AWS Credentials | Amazon Web Services | Authenticate Runbooks with Amazon Web Services (AWS) |
So, what methods I found to start the PowerShell from my WebApp?
- Option 1: Webapp calling a PowerShell Azure RM Automation Runbook.
- Option 2: Webapp calling an Azure Automation webhooks. Great way of doing it. A webhook allows you to start a particular runbook in Azure Automation through a single HTTP request. The webhook would allow external services such as my custom application to start runbooks.
- Option 3: Webapp calling a PowerShell script. The issue here becomes the authentication.
Let’s start with Option 1. I will discuss the other options in the next posts
Option 1: Webapp calling a PowerShell Azure RM Automation Runbook
You can use PowerShell Workflow (recommended as you can use parallel processing to perform multiple actions in parallel) or PowerShell Script. More info here.
Note: You can’t convert runbooks from one type to another.
Create an Azure automation account
1.1. Log in to the Azure portal.
1.2. Click New > Management > Automation Account
1.3. In the Add Automation Account blade, configure your Automation Account details (e.g. Name)
1.4. From your automation account, click the Assets part to open the Assets blade to create a new credential.
1.5. Click the Credentials part to open the Credentials blade.
1.6. Click Add a credential at the top of the blade.
1.7. Complete the form and click Create to save the new credential. For more info see Credential assets in Azure Automation
Create a PowerShell script/workflow with the commands required for your solution (for example: get a list of VM’s)
$cred = Get-AutomationPSCredential –Name “Replace with the Crendential NAME”
Add-AzureRMAccount –Credential $cred Select-AzureSubscription –SubscriptionName “replace your Subscription NAME”
Get-AzureVM
Create an Azure Automation Runbook
1.8. In the Azure Portal, click on Automation Accounts and select the Automation account you created previously
1.9. Click on the Runbooks tile to open the list of runbooks.
1.10. Click on the Add a runbook button and then Import.
1.11. Click Runbook file to select the file to import
1.12. If the Name field is enabled, then you have the option to change it. The runbook name must start with a letter and can have letters, numbers, underscores, and dashes.
1.13. Select a runbook type taking into account the restrictions listed above.
1.14. The new runbook will appear in the list of runbooks for the Automation Account.
1.15. You must publish the runbook before you can run it.
Alternatively, to import a runbook from a script file with Windows PowerShell:
$AutomationAcct = “Your Automation Account Name”
$runbookName = “TestRunbook”
$scriptPath = “c:\MyRunbooks\TestRunbook.ps1”
Set-AzureAutomationRunbookDefinition -AutomationAccountName $AutomationAcct -Name $runbookName -Path $ scriptPath -Overwrite
Publish-AzureAutomationRunbook -AutomationAccountName $AutomationAcct –Name $runbookName
Create an ASP.NET website which will call a PowerShell command.
The Webapp should call the following PowerShell:
Start-AzureAutomationRunbook –AutomationAccountName “replace with your Automation Account NAME created in step 1.3″ –Name ” replace with your runbook name. for eample:MyGetVMRunbook ”
For more info, click here
Next Post: Option 2 and 3….
Recommended Books


System Center 2012 R2 Virtual Machine

System Center Virtual Machine Manager 2012 Cookbook

