Archive
Hyper-V 2016 Tp5: Hyper-V Manager Console new features
Here are some important information and improvements Microsoft released for Hyper-V Manager in Tp5:
- Alternate credentials support. You can now use a different set of credentials in Hyper-V Manager when you connect to another Windows Server 2016 TP5 or Windows 10 remote host. You can also save these credentials to make it easier to log on again.
- Previous version management: the New Hyper-V Manager will allow you to manage versions manage computers running Hyper-V on Windows Server 2012/R2 and Windows 8.x client version.
- Updated management protocol – Hyper-V Manager has been updated to communicate with remote Hyper-V hosts using the WS-MAN protocol, which permits CredSSP, Kerberos or NTLM authentication. When you use CredSSP to connect to a remote Hyper-V host, you can do a live migration without enabling constrained delegation in Active Directory. The WS-MAN-based infrastructure also makes it easier to enable a host for remote management. WS-MAN connects over port 80, which is open by default.
- No more Integration services for Windows Virtual Machines. Updates to integration services for Windows guests are distributed through Windows Update. For service providers and hosting companies, this puts the control of applying updates into the hands of the tenants who own the virtual machines. Customers (tenants Administrators) can now update their Windows virtual machines with all updates, including the integration services, using a single method.
- Integration services for Linux and FreeBSD Virtual Machines. Hyper-V supports both emulated and Hyper-V-specific devices for Linux and FreeBSD virtual machines. Linux Integration Services (LIS) or FreeBSD Integration Services (BIS) , the collection of drivers that are required to run Hyper-V-specific devices, has been added to the Linux kernel and is updated for new releases, but Linux distributions based on older kernels may not have the latest enhancements or fixes. Microsoft provides a download containing installable LIS drivers for some Linux installations based on these older kernels.
Note: As some Linux distributions include versions of LIS, make sure you install the latest downloadable version of LIS, if applicable, for your installation.
Download:
- Download Windows Server 2016 Technical Prevew from the Evaluation Center.
- Download Microsoft Hyper-V Server 2016 Technical Prevew from the Evaluation Center.
Hyper-V. CSV Volumes pause states 5120: Workaround
Microsoft is aware that after installing KB3126593 (MS16-014) there may be an issue that causes loss of network packets.
This may cause Cluster Shared Volumes (CSV) on the nodes Failover Clusters to going into a paused state with an event ID 5120 in the System event log what indicates “Status c000020c – STATUS_CONNECTION_DISCONNECTED”.
You will also find that, on the node that owns the CSV volume(s), there will be an event 7031 with the source: “Service Control Manager”, which indicates “The Windows Firewall Service terminated unexpectedly”.
Troubleshooting Cluster Shared Volume Auto-Pauses – Event 5120. https://blogs.msdn.microsoft.com/clustering/2014/12/08/troubleshooting-cluster-shared-volume-auto-pauses-event-5120/
Microsoft is aware of this problem and are working on a fix. But until it is release here is what you could do to get around this issue:
Option 1: Disable the Firewall LOGGING for all profiles (domain, private, public). (just the logging, not the firewall . You don’t want to be un-protected)
1. Start the Windows Firewall with Advanced Security management console (wf.msc)
2. Right-click Windows Firewall with Advanced Security on Local Computer and select Properties
3. For all profiles (Domain, Private, Public), under Logging, click Customize. Set Log Dropped Packets and Log Successful connections to NO.
Option 2. Uninstall https://support.microsoft.com/en-us/kb/3126593 from the systems.
I will post an update once Microsoft releases the Hotfix.
Azure Automation: Calling a PowerShell from a WebApp
I am working on a project that requires an Azure PowerShell to be called from a WebApp. Without entering in the details of the app, I faced a problem when writing the PowerShell script when it came to the authentication and running the PowerShell script from the Azure Automation portal is not my scenario.
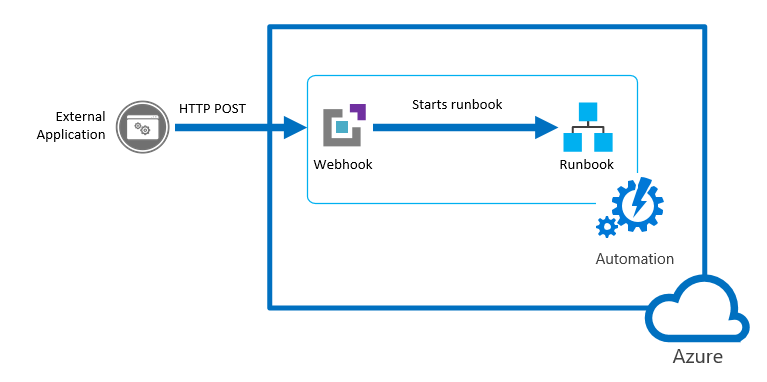
Automation: The figure shows an External App calling a Microsoft Azure Webhook to starts a runbook
Before I start, let’s have a look on the authentication Methods. The following table summarizes the different authentication methods for each environment supported by Azure Automation and the article describing how to setup authentication for your runbooks.
| Method | Environment | Article |
| Azure AD User Account | Azure Resource Manager and Azure Service Management | Authenticate Runbooks with Azure AD User account |
| Azure AD Service Principal object | Azure Resource Manager | Authenticate Runbooks with Azure Run As account |
| Windows Authentication | On-Premises Datacenter | Authenticate Runbooks for Hybrid Runbook Workers |
| AWS Credentials | Amazon Web Services | Authenticate Runbooks with Amazon Web Services (AWS) |
So, what methods I found to start the PowerShell from my WebApp?
- Option 1: Webapp calling a PowerShell Azure RM Automation Runbook.
- Option 2: Webapp calling an Azure Automation webhooks. Great way of doing it. A webhook allows you to start a particular runbook in Azure Automation through a single HTTP request. The webhook would allow external services such as my custom application to start runbooks.
- Option 3: Webapp calling a PowerShell script. The issue here becomes the authentication.
Let’s start with Option 1. I will discuss the other options in the next posts
Option 1: Webapp calling a PowerShell Azure RM Automation Runbook
You can use PowerShell Workflow (recommended as you can use parallel processing to perform multiple actions in parallel) or PowerShell Script. More info here.
Note: You can’t convert runbooks from one type to another.
Create an Azure automation account
1.1. Log in to the Azure portal.
1.2. Click New > Management > Automation Account
1.3. In the Add Automation Account blade, configure your Automation Account details (e.g. Name)
1.4. From your automation account, click the Assets part to open the Assets blade to create a new credential.
1.5. Click the Credentials part to open the Credentials blade.
1.6. Click Add a credential at the top of the blade.
1.7. Complete the form and click Create to save the new credential. For more info see Credential assets in Azure Automation
Create a PowerShell script/workflow with the commands required for your solution (for example: get a list of VM’s)
$cred = Get-AutomationPSCredential –Name “Replace with the Crendential NAME”
Add-AzureRMAccount –Credential $cred Select-AzureSubscription –SubscriptionName “replace your Subscription NAME”
Get-AzureVM
Create an Azure Automation Runbook
1.8. In the Azure Portal, click on Automation Accounts and select the Automation account you created previously
1.9. Click on the Runbooks tile to open the list of runbooks.
1.10. Click on the Add a runbook button and then Import.
1.11. Click Runbook file to select the file to import
1.12. If the Name field is enabled, then you have the option to change it. The runbook name must start with a letter and can have letters, numbers, underscores, and dashes.
1.13. Select a runbook type taking into account the restrictions listed above.
1.14. The new runbook will appear in the list of runbooks for the Automation Account.
1.15. You must publish the runbook before you can run it.
Alternatively, to import a runbook from a script file with Windows PowerShell:
$AutomationAcct = “Your Automation Account Name”
$runbookName = “TestRunbook”
$scriptPath = “c:\MyRunbooks\TestRunbook.ps1”
Set-AzureAutomationRunbookDefinition -AutomationAccountName $AutomationAcct -Name $runbookName -Path $ scriptPath -Overwrite
Publish-AzureAutomationRunbook -AutomationAccountName $AutomationAcct –Name $runbookName
Create an ASP.NET website which will call a PowerShell command.
The Webapp should call the following PowerShell:
Start-AzureAutomationRunbook –AutomationAccountName “replace with your Automation Account NAME created in step 1.3″ –Name ” replace with your runbook name. for eample:MyGetVMRunbook ”
For more info, click here
Next Post: Option 2 and 3….
Recommended Books


System Center 2012 R2 Virtual Machine

System Center Virtual Machine Manager 2012 Cookbook

