Archive
Queensland IT Flood Relief Program : Help needed
Queensland IT Flood Relief Program
Source : http://www.qlditrelief.org/
The January floods through Queensland have crippled industry throughout the state. With many small/medium business losing valuable equipment getting back up and running is going to be an ominous and expensive task for most.
The Queensland Flood IT relief team is a group of volunteers who are collecting spare PC’s, printers, servers, from companies all across Australia. We will then service, and rebuild them with an aim to send them to people in Queensland who need the support to get started.
If you are a business, sole trader, school, or any other organisation that has lost IT equipment in the flood, please register you interest below and let us know what you need. We will be in touch shortly.
To allow us to succeed we firstly need your help.
If you can donate any of the following please do so ASAP to allow our team time to process the donations:
- Computers – PC, Macs, Laptops, etc.
- Servers or networking equipment
- Spare parts – cases, hard drives, memory, cables, etc.
- Printers
- Phones/PBX system
- Tools (to allow us to do our job)
- Software
- Anything else you think will help.
Equipment can be sent to:
QLD IT Relief Fund c/o Datacom, Level 7, 120 Sussex St, Sydney, NSW
If you want to contact us please do so via our email address.
We need transport! If you could help us get our refurbished equipment from NSW to the people who need it please get in touch ASAP!
We also need your time. If you work in IT, and can help our team clean/repair/rebuild equipment let us know. Any time you can spare is greatly appreciated.
Please note: The IT Relief Fund will not accept cash or financial support, please donate this directly to the QLD Relief fund , but we will greatly appreciate any other support for our cause.
Hotfix to improve and help prevent corruption of the WMI repository for W2003 and XP
A hotfix is available for Windows Management Instrumentation (WMI) in Microsoft Windows Server 2003. This hotfix improves the stability of the WMI repository. The hotfix includes many of the improvements that are available in WMI in Windows Vista.
The WMI improvements that Windows Vista includes have been ported to Windows XP and to Microsoft Windows Server 2003. You can use the hotfix that is mentioned in this article to improve the stability of the repository on computers that are running Windows Server 2003. This hotfix helps increase the probability that the repository remains stable if you experience an unexpected problem in Windows.
http://support.microsoft.com/kb/933061
Note : You will need to restart the computer after you apply this hotfix
For more information about a version of this hotfix for 32-bit versions of Windows XP : 933062 (http://support.microsoft.com/kb/933062/ ) A hotfix is available that improves the stability of the Windows Management Instrumentation repository in Windows XP
Microsoft MVP Award 2011
It’s just amazing start a new year with that kind of news:
For the 3rd year in a row a got award by Microsoft : Most Valuable Professional in Virtual machine expertise : https://mvp.support.microsoft.com/profile/Alessandro
Microsoft Letter: “Congratulations! We are pleased to present you with the 2011 Microsoft® MVP Award! This award is given to exceptional technical community leaders who actively share their high quality, real world expertise with others. We appreciate your outstanding contributions in Virtual Machine technical communities during the past year.”
I would like to thank the Microsoft Virtualization Team in Redmond led by Ben Armstrong for the credit and support and also my MVP Lead Nick Ellery and specially to my wife and kids for the unconditional support.
It’s really amazing to be recognized for something you do by pleasure! Being part of the community, sharing knowledge and experience, writing in blogs, helping in forums and speaking in events it’s for real!!!! You can’t imagine how much I learn from doing this!!
Again thank you all for the support
Happy 2011!
Backing Up Virtual Machines on CSV with Hardware VSS Providers, Set to Register KEY
If you are using a hardware VSS provider, you can back up multiple virtual machines from the same CSV/node in the cluster.
To allow a maximum of three backups to run concurrently on each node, specify the number of concurrent backups that can run from a node.
Set the following registry key:
Key
HKLMSoftwareMicrosoftMicrosoft Data Protection Manager2.0ConfigurationMaxAllowedParallelBackups
Value Microsoft Hyper-V
Data 3
Type DWORD
Microsoft does not recommend that you do not use a value greater than 3 for optimal performance
Backing Up Virtual Machines on CSV with the System VSS Provider : Recommendations
If your SAN vendor does not have hardware VSS providers, you can use software snapshots to back up your virtual machines.
We recommend that virtual machines deployed on CSV should be backed up serially.
There are two aspects to serialization of backup jobs in a CSV environment:
- Serializing virtual machine backups on a per node basis.
To ensures that only one backup job will run at a time on a Hyper-V host, create the following registry key on the DPM server:
|
Key |
HKLMSoftwareMicrosoftMicrosoft Data Protection Manager2.0ConfigurationMaxAllowedParallelBackups |
|
Value |
Microsoft Hyper-V |
|
Data |
1 |
|
Type |
DWORD |
- Serializing virtual machine backups on a per CSV LUN basis.
This form of serialization limits the number of virtual machine backups happening on a single CSV LUN. This is done by creating a DataSourceGroups.xml file and placing it in the DPM server at %PROGRAMFILES%Microsoft DPMDPMConfig. This file provides DPM with information about the CSV virtual machine deployment configuration/distribution on the various CSV LUN so as to serialize the backups that happen per CSV LUN.
For more information about how to generate the file http://technet.microsoft.com/en-us/library/ff634192.aspx
To upgrade DPM 2007 SP1 running Windows 2003 server to DPM 2010 Windows Server 2008
Follow these steps:
- Apply ALL hotfixes to the DPM 2007 SP1 first.
Update Type
Version
Release Date
Details
DPM 2010 – Beta
3.0.7336.0
09/25/2009
https://connect.microsoft.com/Downloads/DownloadDetails.aspx?SiteID=840&DownloadID=22070
DPM 2007 – Hotfix
02.00.8861.0000
11/05/2009
DPM 2007 – Hotfix
02.00.8851.0000
08/28/2009
DPM 2007 – Hotfix
02.00.8844.0000
06/04/2009
DPM 2007 – Hotfix
2.0.8836.0
04/14/2009
DPM 2007 – Hotfix
2.00.8824.0
02/16/2009
DPM 2007 – Hotfix
2.0.8811.0
01/09/2009
DPM 2007 – SP1
2.0.8793.0
12/19/2008
DPM 2007 – Hotfix
2.0.8111.0
07/31/2008
DPM 2007 – Feature Pack
2.0.8107.0
07/18/2008
DPM 2007 – Hotfix
DPM 2007 – Hotfix
2.0.5820.0
04/24/2008
DPM 2007 – Hotfix
DPM 2007 – Hotfix
DPM 2007 – Hotfix
01/09/2008
DPM 2007 – RTM
10/17/2008
- Backup the DPM database.
1. From the command prompt, run DPMBackup.exe –db
2. Browse to Program FilesMicrosoft Data Protection ManagerDPMVolumesShadowCopyDatabase Backups. The file name of the DPM database backup is DPMDB.bak. Copy it to the media to which you want. - Uninstall DPM and choose to retain data. ( important!!! )
1. Click Add or Remove Programs on the Control Panel, and then click Change or Remove Programs.
2. Under Currently installed programs, select Microsoft System Center Data Protection Manager 2007 and then click Change/Remove.
3. On the Uninstallation Options page, select the Retain data option, and then click Next.
4. On the Summary of Options page, click Uninstall.
5. When uninstallation is complete, click Close
- Uninstall Powershell.
1. In Control Panel, click Add or Remove Programs, and then click Change or Remove Programs.
2. Under Currently installed programs, select Windows Powershell and then click Change/Remove
- Upgrade the server to Windows Server 2008/Windows 2008 R2 ( remember DPM 2010 only installs on x64 ).
1. Make sure that the bit version of both operating systems are same. If not, then you need to do a clean installation for the x64 bits
- Delete the DPM database.
1. Open the Microsoft SQL Server Management Studio
2. Select the MS$DPM2007$ database, and then click Connect.
3. Expand Databases, right-click the DPMDB database, and then click Delete.
4. Click Yes to confirm the deletion
- Install DPM 2010.
- Restore the DPM database.
1. Browse to the backup Path.
2. From the command prompt, type DpmSync –restored –dbloc < DPMDB location> and then press ENTER

3. From the command prompt, type DpmSync -sync
Ofiice DevCon : University Of Queensland (St. Lucia campus : 31st October-1st November
Office DevCon is the largest and most popular annual community-driven conference that allows Microsoft Office developers and power users to come together in one location to hear expert speakers present on a wide range of Microsoft Office-related topics.
2009 will be our third year, and we are planning to build on the unprecedented success of the first two years.
Come along and discover how to do things you never knew you could do with the Microsoft Office suite of products
Where and when?
This year, Office DevCon will be held at: University Of Queensland (St. Lucia campus) 31st October-1st November
What will be covered?
![]()
We have Microsoft and industry experts from around the world who will present advanced topics the following products.
- Access
- Word
- Excel
- PowerPoint
- InfoPath
- Groove
- SharePoint
- and more….
click here for more details
See you there….
Deleting windows.old after upgrading to windows 7
Deleting the windows.old folder manually
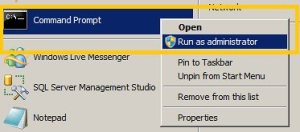
1) Open an elevated command prompt ( runas administrator )
- Click start
- Type: cmd
- right-click it under programs
- click Run As Administrator
2) Take ownership
- takeown c /F /A /R /D
3) grant yourself permission
- icacls c:windows.old /grant Administrators:F /T /L /Q
4) Delete the folder
Make sure you close any explorer or command windows that are looking at or inside the windows.old folder (except for the command window you are using). If you don’t, you will receive an error while performing this step.
- rd /S /Q windows.old
Hyper-V Remote management tools packages
The Hyper-V management tools are available separately to allow remote management of a server running Hyper-V. Packages are available to install the tools on Windows Vista with Service Pack 1 (SP1) and on 32-bit editions of Windows Server 2008. The following download packages are available:
· For 64-bit editions of Windows Vista with SP1, see http://go.microsoft.com/fwlink/?LinkId=123540.
· For 32-bit editions of Windows Vista with SP1, see http://go.microsoft.com/fwlink/?LinkId=123541.
· For 32-bit editions of Windows Server 2008, see http://go.microsoft.com/fwlink/?LinkId=123542.
![]() Important
Important
The remote management tools update package for the 32-bit editions of Windows Server 2008 is a permanent package. Once you install the update package, you cannot remove it.
For instructions about installing the tools, see Install and Configure Hyper-V Tools for Remote Administration.
Hyper-V Storage considerations for Backup Strategy
As you plan your backup strategy, consider the compatibility between the storage and backup solutions:
· Virtual hard disks. These offer the best compatibility and can be stored on many types of physical media. For more information about the types of storage you can use with Hyper-V, see Hardware Considerations.
· Physical disks that are directly attached to a virtual machine. These disks cannot be backed up by the Hyper-V VSS writer. As a result, this type of disk will not be included in any backup performed by a backup program that uses the Hyper-V VSS writer. In this situation, you would need to use some other process to back up the physical disk, such as running a backup application within the guest operating system.
· iSCSI-based storage. This storage is supported for backup by the Hyper-V VSS writer when the storage is connected through the management operating system and the storage is used for virtual hard disks.
· Storage accessed from a virtual machine by using an Internet SCSI (iSCSI) initiator within the guest operating system. This storage will not be included in a backup of the physical computer. In this scenario, you must use another process to back up the data from the iSCSI-based storage before you perform a full server backup. For example, you could run a backup of the data on the iSCSI storage from a backup application running in the guest operating system.
For more information about deploying storage for Hyper-V, see Implementing Disks and Storage.
Recommended Books


System Center 2012 R2 Virtual Machine

System Center Virtual Machine Manager 2012 Cookbook

