Azure Automation: Calling a PowerShell from a WebApp
I am working on a project that requires an Azure PowerShell to be called from a WebApp. Without entering in the details of the app, I faced a problem when writing the PowerShell script when it came to the authentication and running the PowerShell script from the Azure Automation portal is not my scenario.
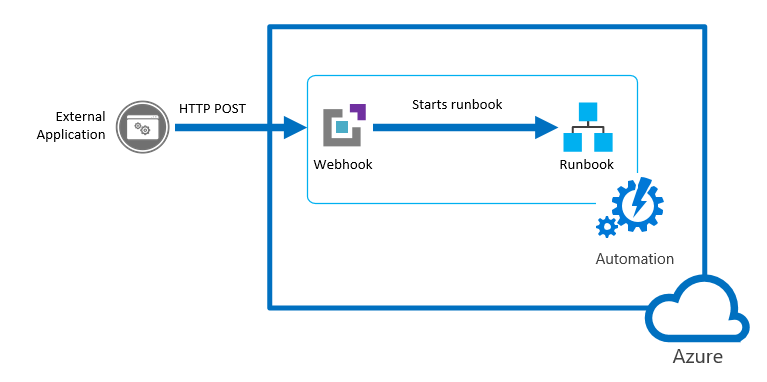
Automation: The figure shows an External App calling a Microsoft Azure Webhook to starts a runbook
Before I start, let’s have a look on the authentication Methods. The following table summarizes the different authentication methods for each environment supported by Azure Automation and the article describing how to setup authentication for your runbooks.
| Method | Environment | Article |
| Azure AD User Account | Azure Resource Manager and Azure Service Management | Authenticate Runbooks with Azure AD User account |
| Azure AD Service Principal object | Azure Resource Manager | Authenticate Runbooks with Azure Run As account |
| Windows Authentication | On-Premises Datacenter | Authenticate Runbooks for Hybrid Runbook Workers |
| AWS Credentials | Amazon Web Services | Authenticate Runbooks with Amazon Web Services (AWS) |
So, what methods I found to start the PowerShell from my WebApp?
- Option 1: Webapp calling a PowerShell Azure RM Automation Runbook.
- Option 2: Webapp calling an Azure Automation webhooks. Great way of doing it. A webhook allows you to start a particular runbook in Azure Automation through a single HTTP request. The webhook would allow external services such as my custom application to start runbooks.
- Option 3: Webapp calling a PowerShell script. The issue here becomes the authentication.
Let’s start with Option 1. I will discuss the other options in the next posts
Option 1: Webapp calling a PowerShell Azure RM Automation Runbook
You can use PowerShell Workflow (recommended as you can use parallel processing to perform multiple actions in parallel) or PowerShell Script. More info here.
Note: You can’t convert runbooks from one type to another.
Create an Azure automation account
1.1. Log in to the Azure portal.
1.2. Click New > Management > Automation Account
1.3. In the Add Automation Account blade, configure your Automation Account details (e.g. Name)
1.4. From your automation account, click the Assets part to open the Assets blade to create a new credential.
1.5. Click the Credentials part to open the Credentials blade.
1.6. Click Add a credential at the top of the blade.
1.7. Complete the form and click Create to save the new credential. For more info see Credential assets in Azure Automation
Create a PowerShell script/workflow with the commands required for your solution (for example: get a list of VM’s)
$cred = Get-AutomationPSCredential –Name “Replace with the Crendential NAME”
Add-AzureRMAccount –Credential $cred Select-AzureSubscription –SubscriptionName “replace your Subscription NAME”
Get-AzureVM
Create an Azure Automation Runbook
1.8. In the Azure Portal, click on Automation Accounts and select the Automation account you created previously
1.9. Click on the Runbooks tile to open the list of runbooks.
1.10. Click on the Add a runbook button and then Import.
1.11. Click Runbook file to select the file to import
1.12. If the Name field is enabled, then you have the option to change it. The runbook name must start with a letter and can have letters, numbers, underscores, and dashes.
1.13. Select a runbook type taking into account the restrictions listed above.
1.14. The new runbook will appear in the list of runbooks for the Automation Account.
1.15. You must publish the runbook before you can run it.
Alternatively, to import a runbook from a script file with Windows PowerShell:
$AutomationAcct = “Your Automation Account Name”
$runbookName = “TestRunbook”
$scriptPath = “c:\MyRunbooks\TestRunbook.ps1”
Set-AzureAutomationRunbookDefinition -AutomationAccountName $AutomationAcct -Name $runbookName -Path $ scriptPath -Overwrite
Publish-AzureAutomationRunbook -AutomationAccountName $AutomationAcct –Name $runbookName
Create an ASP.NET website which will call a PowerShell command.
The Webapp should call the following PowerShell:
Start-AzureAutomationRunbook –AutomationAccountName “replace with your Automation Account NAME created in step 1.3″ –Name ” replace with your runbook name. for eample:MyGetVMRunbook ”
For more info, click here
Next Post: Option 2 and 3….
Recommended Books


System Center 2012 R2 Virtual Machine

System Center Virtual Machine Manager 2012 Cookbook

