Archive
Hyper-V Networking improvements: NAT. and what does it means to you?
For many years I have been using Hyper-V in my laptop, which is specially useful considering a run many demos and from time to time I speak at conferences that requires you or to have 2 or 3 computers or to run virtualisation in your laptop.
But, to run some demos I needed network in my Virtual Machines, particularly internet connection, and in most cases that was not easy to accomplish. The trick I used to have: a Internal Virtual Switch assigned to all VM’s and a second External Virtual Switch assigned to a VM acting as a router, running Windows Routing and Remote Access Service, which as you would understand was undermining my demos, by consuming vital resources (memory, cpu…) that I could otherwise assign to VM’s that was actually the demo VM’s.

Other common way to have internet on the Virtual Machines were by creating Connection Sharing (ICS) to connect on a shared Connection.

Anyway, that is now past, as since Microsoft released Creators Update for Windows 10, you can now create a Hyper-V Virtual Switch with NAT support which enables VM’s to be isolated behind a single IP address assigned to the host. This means that you don’t need to setup an ICS or create a VM to act as a route anymore. Also as Sarah Cooley, Hyper-V PM, pointed out in her post, NAT networking is vital to both Docker and Visual Studio’s UWP device emulators and there are two significant improvements to NAT brought by Windows 10 Creators update :
- You can now use for multiple NAT networks (internal prefixes) on a single host.
- You can build and test applications with industry-standard tooling directly from the container host using an overlay network driver (provided by the Virtual Filtering Platform (VFP) Hyper-V switch extension) as well as having direct access to the container using the Host IP and exposed port.
BTW, the process is done by using PowerShell. There is no UI for that. In fact, when you create a NAT Virtual Switch, it will appears as Internal Switch in the Hyper-V UI

To create the NAT Virtual Switch:
- Open the PowerShell console with Admin rights and create an Internal Virtual Switch. In the example below, I am naming the Virtual Switch “vNAT”. You can choose the name you want.
New-VMSwitch -SwitchName “vNAT” -SwitchType Internal

- After creating the Virtual Switch, you need to configure the NAT gateway. This IP address must be from a new range, which will be defined in the next step. Notice the name of the Interface Alias, which is composed by the prefix “VEthernet ” plus the name of the Virtual Switch created in the previous step enclosed in brackets. I am assigning the IP address 10.1.3.1 as a NAT Gateway IP and using 24 as prefix length (255.255.255.0) which would cater for 254 VM’s.
New-NetIPAddress -IPAddress 10.1.3.1 –PrefixLength 24 –InterfaceAlias “vEthernet (vNAT)”

You can otherwise utilise the InterfaceIndex instead of InterfaceAlias. For that, you need to find the interface index (ifindex) of the virtual switch previously created by typing
Get-NetAdapter.
In my case, the interface index is 68.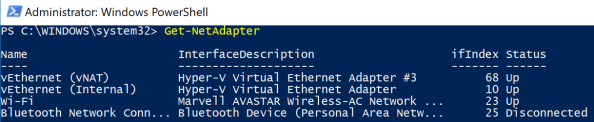
Then executing the following:
New-NetIPAddress -IPAddress 10.1.3.1 –PrefixLength 24 –InterfaceIndex 68
You can check if the IP addresses for the NAT default Gateway were assigned by typing:
Get-NetIPAddress -InterfaceAlias “vEthernet (vNAT)” - The next step is to define the NAT network name and its IP address range, that the VM’s with the assigned Virtual Switch will run on. Make sure the IP address created in the previous step is on the range of this network.
New-NetNAT -Name “NATNetwork” -InternalIPInterfaceAddressPrefix 10.1.3.0/24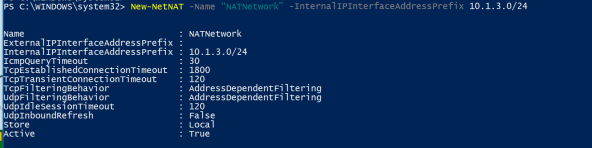
4. The next step is to assign the NAT Virtual Switch to the VM’s to use the NAT virtual switch. You can do that by using PowerShell or the UI.

- The final step is to assign an IP address to the VM’s. You will need to manually configure the network settings for the VM, as the built-in NAT switch doesn’t include a DHCP server for automatic IP address assignment. Assign the default gateway IP address of the private network to the internal VM switch Management Host vNIC.
Note: When the endpoint is attached to a container, the Host Network Service (HNS) allocates and uses the Host Compute Service (HCS) to assign the IP address, gateway IP, and DNS info to the container directly.

 Note: If you require automatic IP address assignment to your VM’s, it can be easily accomplished by adding a DHCP server role to one of the VM’s. In my case, I added the DHCP role to the Domain Controller VM.
Important: To access the VM’s from the external network, you will need to create NAT rules, translating an external TCP/UDP port on the external interface to the NAT Virtual Switch port.
#The following command, maps the Hyper-V host port 80 to port 81 on VM 10.1.3.2
Add-NetNatStaticMapping -NatName “NATnetwork” -Protocol TCP -ExternalIPAddress 0.0.0.0 -InternalIPAddress 10.1.3.2 -InternalPort 81 -ExternalPort 80
If you need to remove the NAT (clean up):
Get-NetNat | Remove-NetNat
Removes existing container networks, vSwitch, NetNat
Recommended Books


System Center 2012 R2 Virtual Machine

System Center Virtual Machine Manager 2012 Cookbook

