Archive
Modernize your workload with #AKS #Kubernets #Containers #MicroServices
When comes to Application Modernisation, we can’t argue that Containers are leading the way. With Containers you can wrap up an application into its own isolated box meaning that app will have no knowledge of any other applications or processes that exist outside of its box.
With Containers, you can wrap up a monolithic application or create a more modern approach: a microservice-based architecture, in which the application is built on a collection of services that can be developed, tested, deployed, and versioned independently, which is perfect for mission-critical application scenarios.
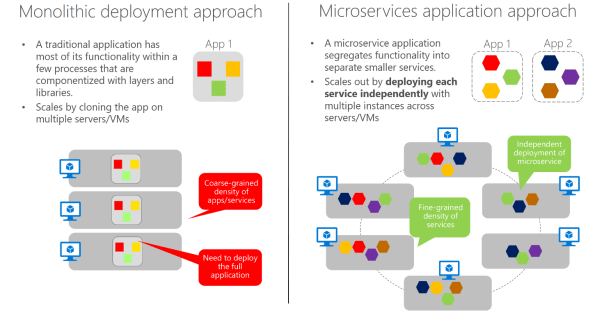
Monolithic deployment versus the microservices approach. Image Source: Microsoft Docs (https://docs.microsoft.com/en-us/dotnet/standard/microservices-architecture/architect-microservice-container-applications/microservices-architecture)
If you own the app source code and are on a optimisation path, I would recommend the microservices approach, which allows agile changes and rapid iteration allowing you to change specific areas of complex, large, and scalable applications. But if do not have the source code or breaking the application code in to small pieces it is not feasible, you still can look at Containers as away to modernize the app. Either way, you also need to consider: Automation, Management, High-Availability, Networking, Scalability, Upgrades and Monitoring requirements.
Automating and Managing Containers:
The task of automating and managing a large number of containers and how they interact is known as orchestration. Azure offers two container orchestrators: Azure Container Service (AKS) and Service Fabric.
Azure Container Service (AKS) makes it simple to create, configure, and manage a cluster of virtual machines that are preconfigured to run containerized applications. This enables you to maintaining application portability through Kubernetes and the Docker image format.
Azure Service Fabric is a distributed systems platform that makes it easy to package, deploy, and manage scalable and reliable microservices and containers. Service Fabric addresses the significant challenges in developing and managing cloud native applications. Service Fabric reresents the next-generation platform for building and managing these enterprise-class, tier-1, cloud-scale applications running in containers.
Modernize existing .NET applications with Azure cloud and Windows Containers Guide/eBook
Microsoft released a guide to help learn how you could move your existing .NET Framework server-applications directly to the cloud by modernizing specific areas, without re-architecting or recoding entire applications. You can download this eBook in multiple formats, too:
.PDF format: https://aka.ms/liftandshiftwithcontainersebook
.MOBI (Kindle) format: https://aka.ms/liftandshiftwithcontainersebookmobi
.EPUB (eReader) format: https://aka.ms/liftandshiftwithcontainersebookepub
For more detailed Information on Containers and Microservices, check out :
- https://docs.microsoft.com/en-us/virtualization/windowscontainers/about/
- https://blogs.msdn.microsoft.com/dotnet/2017/08/02/microservices-and-docker-containers-architecture-patterns-and-development-guidance/
- https://docs.microsoft.com/en-us/dotnet/standard/microservices-architecture/architect-microservice-container-applications/microservices-architecture
- https://blogs.msdn.microsoft.com/dotnet/2017/11/01/modernize-existing-net-apps-with-windows-containers-and-azure/
Now Available: Virtual Machine Manager 2016 book

VMM 2016 book
Virtual Machine Manager (VMM) 2016 is part of the System Center suite to configure and manage private clouds.
Now available: System Center 2016 Virtual Machine Manager Cookbook – Third Edition
The book will be your best companion for day-to-day virtualization needs within your organization, as it takes you through a series of recipes to simplify and plan a highly scalable and available virtual infrastructure. You will learn the deployment tips, techniques, and solutions designed to show users how to improve VMM 2016 in a real-world scenario. The chapters are divided in a way that will allow you to implement the VMM 2016 and additional solutions required to effectively manage and monitor your fabrics and clouds. We will cover the most important new features in VMM 2016 across networking, storage, and compute, including brand new Guarded Fabric, Shielded VMs and Storage Spaces Direct. The recipes in the book provide step-by-step instructions giving you the simplest way to dive into VMM fabric concepts, private cloud, and integration with external solutions such as VMware, Operations Manager, and the Windows Azure Pack.

By the end of this book, you will be armed with the knowledge you require to start designing and implementing virtual infrastructures in VMM 2016.
The book has been updated to reflect the updates available on VMM 2016 1801 release.
What You Will Learn
- Plan and design a VMM architecture for real-world deployment
- Configure fabric resources, including compute, networking, and storage
- Create and manage Storage Spaces Direct clusters in VMM
- Configure Guarded Fabric with Shielded VMs
- Create and deploy virtual machine templates and multi-tier services
- Manage Hyper-V and VMware environments from VMM
- Enhance monitoring and management capabilities
- Upgrade to VMM 2016 from previous versions
Authors
Monitoring Virtual Machine Manager Jobs from OMS Log Analytics #VMM #OMS
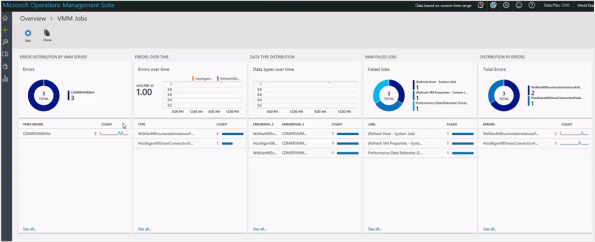 Image Source: Harsh Vardhan Verma
Wondering how you could use Microsoft OMS to have a single view of the jobs’ status across multiple VMM instances?
Well, you can now deploy an open-source solution that can be included in your OMS workspace called Virtual Machine Manager Analytics . This solution brings in the job data of your on-premises VMM instances to the log analytics in OMS. VMM admins can then use this versatile platform to construct queries for searching the relevant data and creating data visualizations.
The Virtual Machine Manager Analytics solution comes with some built-in reports with preconfigured data visualizations so you can easily get started with frequently used queries, such as:
- Distribution of failed jobs across VMM instances to easily scope down the broken instances.
- Distribution of failures over time to find sudden spikes, and to help with correlating the cause and failures.
- Distribution of failed jobs and errors to help with identifying the most error-prone jobs and the cause.
- Distribution of the job runtime across different runs to identify the sluggish and error-prone jobs.
Additionally, the VMM jobs data in OMS Log Analytics can be correlated with the data from other OMS solutions for better debugging and auto resolution with Azure automation Runbooks
 Image Source: Francesco Molfese
VMM 2016 1801 release. Configuration of guest clusters in SDN through VMM has undergone some changes.
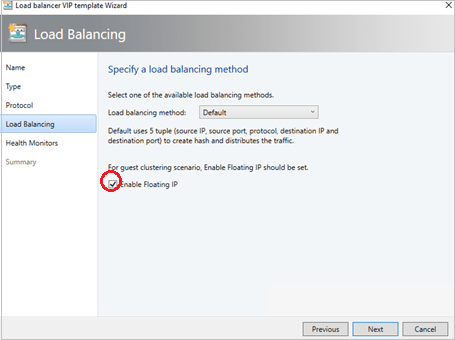
With the release of the update 1801 for System Center VMM 2016, configuration of guest clusters in SDN through VMM has undergone some changes.
With network controller in place, now VMs that are connected to the virtual network using SDN are only allowed to use the IP address that the network controller assigns for communication. Inspired by Azure networking design, VMM enables this feature by emulating the floating IP functionality through the Software Load Balancer (SLB) in the SDN.
IMPORTANT: Network Controller does not support floating IP addresses which are essential for technologies such as Microsoft Failover Clustering to work.
VMM supports guest clustering in SDN through an Internal Load Balancer(ILB) Virtual IP(VIP). Guesting clustering is managed through the SDN NC. Before you start, ensure you have set up SDN and deployed NC and SLB
The ILB uses probe ports which are created on the guest cluster VMs to identify the active node. At any given time, the probe port of only the active node responds to the ILB and all the traffic directed to the VIP is routed to the active node
Sources:
- https://docs.microsoft.com/en-us/system-center/vmm/whats-new-vmm-1801?view=sc-vmm-1801
- https://docs.microsoft.com/en-us/system-center/vmm/sdn-guest-clusters?view=sc-vmm-1801
6 most commom Hyper-V configuration mistakes
Microsoft MVPs Dave and Cristal Kawula developed an eBook when you’ll find useful information about what not to do when Installing and Configuring Hyper-V .
This eBook focuses on the 6 most important Hyper-V configuration mistakes made today and how to avoid them. You’ll learn about:
- Common Deployment Mistakes
- NUMA best practices that won’t affect performance
- Proper use of Anti-Virus with Hyper-V
- Proper use of Checkpoints
You can download the ebook here.
The eBook Authors: Dave Kawula – MVP and Cristal Kawula – MVP
Key features of the new Microsoft Azure Site Recovery Deployment Planner
Azure Site Recovery Deployment Planner is now GA with support for both Hyper-V and VMware.
Disaster Recovery cost to Azure is now added in the report. It gives compute, storage, network and Azure Site Recovery license cost per VM.
ASR Deployment Planner does a deep, ASR-specific assessment of your on-premises environment. It provides recommendations that are required by Azure Site Recovery for successful DR operations such as replication, failover, and DR-Drill of your VMware or Hyper-V virtual machines.
Also, if you intend to migrate your on-premises workloads to Azure, use Azure Migrate for migration planning. Azure Migrate assesses on-premises workloads and provides guidance
Key features of the tool are:
- Estimated Network bandwidth required for initial replication(IR) and delta replication.
- Storage type(standard or premium storage) requirement for each VM.
- Total number of standard and premium storage accounts to be provisioned.
- For VMware, it provides the required number of Configuration Server and Process Server to be deployed on on-prem.
- For Hyper-V, it provides additional storage requirements on on-premises.
- For Hyper-V, the number of VMs that can be protected in parallel (in a batch) and protection order of each batch for successful initial replication.
- For VMware, the number of VMs that can be protected in parallel to complete initial replication in a given time.
- Throughput that ASR can get from on-premises to Azure.
- VM eligibility assessment based on number of disks, size of the disk and IOPS, OS type.
- Estimate DR cost for the target Azure region in the specific currency.
When to use ASR Deployment Planner and Azure Migrate?
- DR from VMware/Hyper-V to Azure
- Migration from VMware to Azure
Download the tool and learn more about VMware to Azure Deployment Planner and Hyper-V to Azure Deployment planner.
New Technical Preview for Microsoft Windows Server management experience Project “Honolulu”, released
Modernized, simplified, integrated, and secure experiences. Project “Honolulu” Technical Preview 1711 update is now available!
Some cool new features were release like the Windows 10 client management: You can now add Windows 10 client machines as connections in Honolulu, and manage them with a subset of tools in the “Computer Management” Solution.
For more information on new and removed features check https://blogs.technet.microsoft.com/windowsserver/2017/12/01/1711-update-to-project-honolulu-technical-preview-is-now-available/
Hyper-V Networking improvements: NAT. and what does it means to you?
For many years I have been using Hyper-V in my laptop, which is specially useful considering a run many demos and from time to time I speak at conferences that requires you or to have 2 or 3 computers or to run virtualisation in your laptop.
But, to run some demos I needed network in my Virtual Machines, particularly internet connection, and in most cases that was not easy to accomplish. The trick I used to have: a Internal Virtual Switch assigned to all VM’s and a second External Virtual Switch assigned to a VM acting as a router, running Windows Routing and Remote Access Service, which as you would understand was undermining my demos, by consuming vital resources (memory, cpu…) that I could otherwise assign to VM’s that was actually the demo VM’s.

Other common way to have internet on the Virtual Machines were by creating Connection Sharing (ICS) to connect on a shared Connection.

Anyway, that is now past, as since Microsoft released Creators Update for Windows 10, you can now create a Hyper-V Virtual Switch with NAT support which enables VM’s to be isolated behind a single IP address assigned to the host. This means that you don’t need to setup an ICS or create a VM to act as a route anymore. Also as Sarah Cooley, Hyper-V PM, pointed out in her post, NAT networking is vital to both Docker and Visual Studio’s UWP device emulators and there are two significant improvements to NAT brought by Windows 10 Creators update :
- You can now use for multiple NAT networks (internal prefixes) on a single host.
- You can build and test applications with industry-standard tooling directly from the container host using an overlay network driver (provided by the Virtual Filtering Platform (VFP) Hyper-V switch extension) as well as having direct access to the container using the Host IP and exposed port.
BTW, the process is done by using PowerShell. There is no UI for that. In fact, when you create a NAT Virtual Switch, it will appears as Internal Switch in the Hyper-V UI

To create the NAT Virtual Switch:
- Open the PowerShell console with Admin rights and create an Internal Virtual Switch. In the example below, I am naming the Virtual Switch “vNAT”. You can choose the name you want.
New-VMSwitch -SwitchName “vNAT” -SwitchType Internal

- After creating the Virtual Switch, you need to configure the NAT gateway. This IP address must be from a new range, which will be defined in the next step. Notice the name of the Interface Alias, which is composed by the prefix “VEthernet ” plus the name of the Virtual Switch created in the previous step enclosed in brackets. I am assigning the IP address 10.1.3.1 as a NAT Gateway IP and using 24 as prefix length (255.255.255.0) which would cater for 254 VM’s.
New-NetIPAddress -IPAddress 10.1.3.1 –PrefixLength 24 –InterfaceAlias “vEthernet (vNAT)”

You can otherwise utilise the InterfaceIndex instead of InterfaceAlias. For that, you need to find the interface index (ifindex) of the virtual switch previously created by typing
Get-NetAdapter.
In my case, the interface index is 68.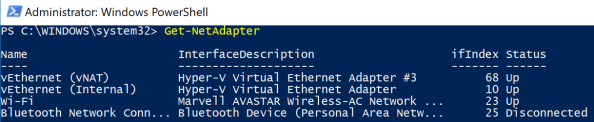
Then executing the following:
New-NetIPAddress -IPAddress 10.1.3.1 –PrefixLength 24 –InterfaceIndex 68
You can check if the IP addresses for the NAT default Gateway were assigned by typing:
Get-NetIPAddress -InterfaceAlias “vEthernet (vNAT)” - The next step is to define the NAT network name and its IP address range, that the VM’s with the assigned Virtual Switch will run on. Make sure the IP address created in the previous step is on the range of this network.
New-NetNAT -Name “NATNetwork” -InternalIPInterfaceAddressPrefix 10.1.3.0/24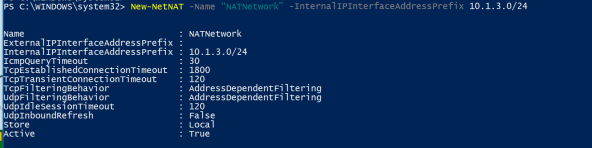
4. The next step is to assign the NAT Virtual Switch to the VM’s to use the NAT virtual switch. You can do that by using PowerShell or the UI.

- The final step is to assign an IP address to the VM’s. You will need to manually configure the network settings for the VM, as the built-in NAT switch doesn’t include a DHCP server for automatic IP address assignment. Assign the default gateway IP address of the private network to the internal VM switch Management Host vNIC.
Note: When the endpoint is attached to a container, the Host Network Service (HNS) allocates and uses the Host Compute Service (HCS) to assign the IP address, gateway IP, and DNS info to the container directly.

 Note: If you require automatic IP address assignment to your VM’s, it can be easily accomplished by adding a DHCP server role to one of the VM’s. In my case, I added the DHCP role to the Domain Controller VM.
Important: To access the VM’s from the external network, you will need to create NAT rules, translating an external TCP/UDP port on the external interface to the NAT Virtual Switch port.
#The following command, maps the Hyper-V host port 80 to port 81 on VM 10.1.3.2
Add-NetNatStaticMapping -NatName “NATnetwork” -Protocol TCP -ExternalIPAddress 0.0.0.0 -InternalIPAddress 10.1.3.2 -InternalPort 81 -ExternalPort 80
If you need to remove the NAT (clean up):
Get-NetNat | Remove-NetNat
Removes existing container networks, vSwitch, NetNat
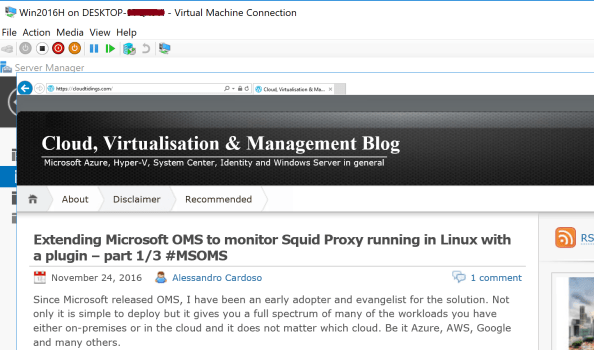
Extending Microsoft OMS to monitor Squid Proxy running in Linux with a plugin – part 1/3 #MSOMS
Since Microsoft released OMS, I have been an early adopter and evangelist for the solution. Not only it is simple to deploy but it gives you a full spectrum of many of the workloads you have either on-premises or in the cloud and it does not matter which cloud. Be it Azure, AWS, Google and many others.
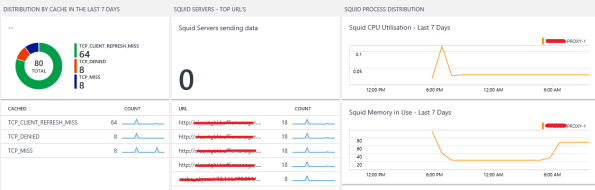
So, as I was advising on OMS for a customer, I found that they were running Squid Proxy servers. The Squid proxy server is one of the most famous proxy servers in the world and it has been utilised for years in many organisations. For that reason I then I decided to look at how OMS could leverage the monitoring for Squid.

As you can see here: https://github.com/Microsoft/OMS-Agent-for-Linux/tree/master/installer/conf/omsagent.d there are already many plugins for OMS to monitor Windows and many Linux OS as well, DNS, Network, SQL, MySQL, Postgree, VMware, MongoDB, Security, Audit, Change Tracking and so on.
But, there was no Squid plugin and that’s where I brought back my past years of experience as a developer and although that was a long, long time go, I was able to developer in ruby a Squid plugin for Microsoft OMS.
How I developed it?
PART 1 : LOG Files
- I started but investigating the squid log on /var/log/squid/access.log and then I research REGEX expressions to extract information out of it. Below is a extract of it
1479696836.902 134 10.1.1.4 TCP_MISS/301 488 open http://cnn.com/ – HIER_DIRECT/151.101.0.73 –
1479696848.110 242 10.1.1.4 TCP_MISS/400 486 open http://www.sydney.com/ – HIER_DIRECT/54.253.253.77 text/html
1479696860.004 407 10.1.1.4 TCP_MISS/301 636 open http://www.7news.com.au/ – HIER_DIRECT/203.84.217.229 text/html
The initial difficult part for me was of to decouple the date/time to get it on a human readable format. So, after long hours of research and playing along, I decided for the following REGEX :
- I then wrote a squidparserlog.rb in ruby to parse the Squid access.log file and turn it into a OMS format
class SquidLogParserLib
require ‘date’
require ‘etc’
require_relative ‘oms_common’
require ‘fluent/parser’def initialize(error_handler)
@error_handler = error_handler
endREGEX =/(?<eventtime>(\d+))\.\d+\s+(?<duration>(\d+))\s+(?<sourceip>(\d+\.\d+\.\d+\.\d+))\s+(?<cache>(\w+))\/(?<status>(\d+))\s+(?<bytes>(\d+)\s+)(?<response>(\w+)\s+)(?<url>([^\s]+))\s+(?<user>(\w+|\-))\s+(?<method>(\S+.\S+))/def parse(line)data = {}
time = Time.now.to_fbegin
REGEX.match(line) { |match|
data[‘Host’] = OMS::Common.get_hostnametimestamp = Time.at( match[‘eventtime’].to_i() )
data[‘EventTime’] = OMS::Common.format_time(timestamp)
data[‘EventDate’] = timestamp.strftime( ‘%Y-%m-%d’ )
data[‘Duration’] = match[‘duration’].to_i()
data[‘SourceIP’] = match[‘sourceip’]
data[‘cache’] = match[‘cache’]
data[‘status’] = match[‘status’]
data[‘bytes’] = match[‘bytes’].to_i()
data[‘httpresponse’] = match[‘response’]
data[‘bytes’] = match[‘bytes’].to_i()
data[‘url’] = match[‘url’]
data[‘user’] = match[‘user’]
data[‘method’] = match[‘method’]}
rescue => e
@error_handler.logerror(“Unable to parse the line #{e}”)
endreturn time, data
end #defend #class
<source>
type tail
format SquidLogParser
path /var/log/squid/access.log
pos_file /var/opt/microsoft/omsagent/state/var_log_squid_access.pos
tag oms.api.Squid
log_level error
</source>

On my next article I will go through the next part, which is getting Squid Proxy Statistics in OMS, along with the full code.
Recommended Books


System Center 2012 R2 Virtual Machine

System Center Virtual Machine Manager 2012 Cookbook

