Archive
Windows 2012 : Hyper-V Network design scenarios and setup – Part 1
I am starting a series of blogs to talk about Network in Windows 2012 Hyper-V
I will be covering the following scenarios, but of course there are many more possibilities :
- Scenario 1 : 4 (or more) 10GB Nic’s + 2 ISCSI/FC connectivity
- Scenario 2 : 2 (or more) 10GB Nic’s (converged network)
- Scenario 3 : 6 (or more) Nic’s 1GB Nic’s
Let’s start with scenario 1. We will create 2 teams : one for management/csv/live migration (MGMT-LM-CSV-TEAM) and other for vm external traffic (VM-TEAM).
1. First of all, I recommend you to rename the physical nic’s. We will create the teams as per bellow:
a) 2 nic’s, teamed to be used for management + csv + live migration utilisation= MGMT-LM-CSV-TEAM
b) 2 (or more) nic’s teamed to be used for VM traffic only ( external traffic ) = VM-TEAM
c) 2 ISCSI or Fiber Channel connectivity. You will need to install the MPIO feature ( DO NOT TEAM)
As for the team VM-TEAM we can use the GUI to create the virtual switch:
- Click on Server Manager, then click on Local Server
- Click on Nic Teaming. Click on Task and then click on NEW TEAM

Select the NIC’s that will be part of the team. Make sure you select NIC’s from different Physical interfaces. Done
But for the MGMT-LM-CSV-TEAM, we need to use the Powershell as the GUI does not allow us to create multiples Virtual Switches for the same team and then we will also, configure the QoS.
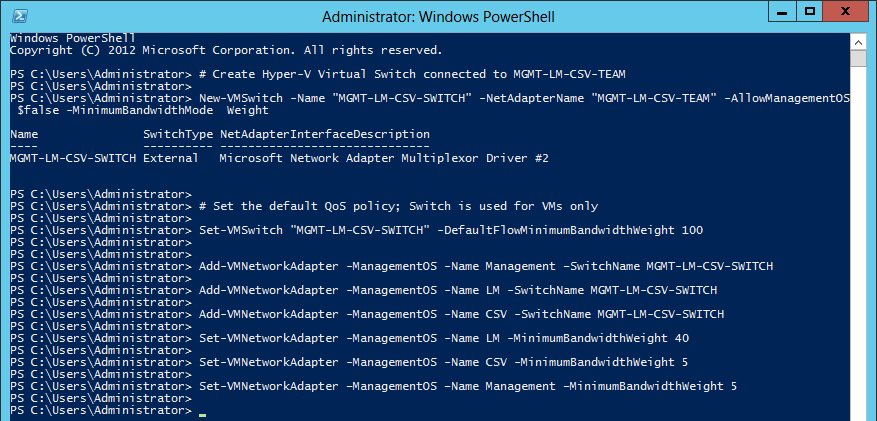
Here is the PowerShell command
# Create Hyper-V Virtual Switch connected to VM-TEAM
New-VMSwitch -Name “External” -NetAdapterName “VM-TEAM” -AllowManagementOS $false
# Create Hyper-V Virtual Switch connected to MGMT-LM-CSV-TEAM
New-VMSwitch -Name “MGMT-LM-CSV-SWITCH” -NetAdapterName “MGMT-LM-CSV-TEAM” -AllowManagementOS 0 -MinimumBandwidthMode Weight
# Set the default QoS policy; Switch is used for VMs only
Set-VMSwitch “MGMT-LM-CSV-SWITCH” -DefaultFlowMinimumBandwidthWeight 100
Add-VMNetworkAdapter -ManagementOS -Name Management –SwitchName MGMT-LM-CSV-SWITCH
Add-VMNetworkAdapter -ManagementOS -Name LM -SwitchName MGMT-LM-CSV-SWITCH
Add-VMNetworkAdapter -ManagementOS -Name CSV -SwitchName MGMT-LM-CSV-SWITCH
Set-VMNetworkAdapter -ManagementOS -Name LM -MinimumBandwidthWeight 40
Set-VMNetworkAdapter -ManagementOS -Name CSV -MinimumBandwidthWeight 5
Set-VMNetworkAdapter –ManagementOS –Name Management –MinimumBandwidthWeight 5
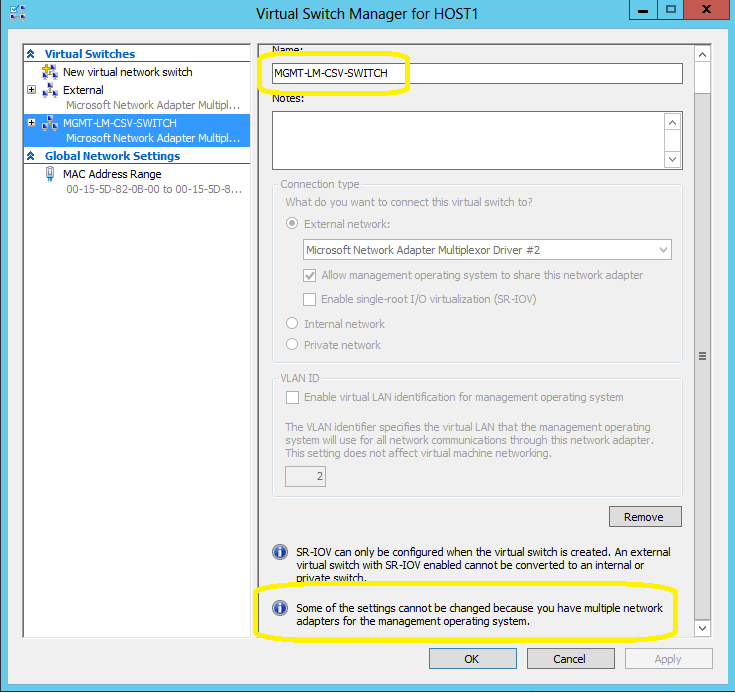
Now let’s have a look back on the GUI (NIC Team):

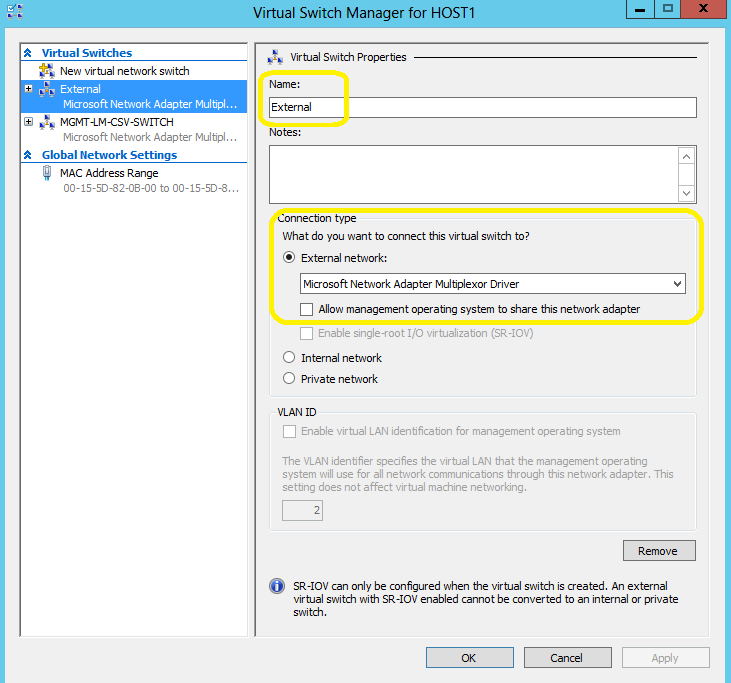
And let’s have a look in the Hyper-V Manager Console, on the properties of the Virtual Switch’s:
Management, Live Migration and CSV switch: MGMT-LM-CSV-SWITCH.
Note that you won’t be able to change any setting using the GU
I as we created 3 virtual network adapters (mgmt,lm,csv).
VM external traffic switch: External
to be continue….
Windows Server 2012/R2 and NIC teaming modes and how to
NIC teaming, the new feature of Windows 2012/R2, allows multiple network adapters on a computer to be placed into a team for the following purposes:
- Bandwidth aggregation
– Traffic failover to prevent connectivity loss in the event of a network component failure
Modes:
- Generic or static teaming (IEEE 802.3ad draft v1): This mode requires configuration on the switch and the computer to identify which links form the team. Because this is a statically configured solution, no additional protocol assists the switch and the computer to identify incorrectly plugged cables or other errors that could cause the team to fail. This mode is typically supported by server-class switches.
- Dynamic teaming (IEEE 802.1ax, LACP): IEEE 802.1ax uses the Link Aggregation Control Protocol (LACP) to dynamically identify links between the computer and a specific switch. This enables the automatic creation of a team and, in theory, the expansion and reduction of a team simply by the transmission or receipt of LACP from the peer network adapter. Typical server-class switches support IEEE 802.1ax, but most switches require manual administration to enable LACP on the port.
- Switch independent: do not require that the team members connect to different switches, they merely make it possible.
Characteristics:
- It is manageable through both PowerShell and the GUI
- Supported on various NIC types/vendors
- You can team up to 32 NICs
- Unlimited virtual interfaces
- Multiple teaming modes
- NIC teams can only be formed between homogenous NICs. So two 1GB NICs can be teamed, or two 10GB NICs can be teamed, but you cannot team a 1GB and 10GB NIC.
- If the individual NIC support Receive Side Scaling (RSS), the NIC team also supports RSS. Hence it is a good idea to team NICs that support RSS. The resulting NIC team is also highly capable and does not lose any functionality.
- If the individual NIC supports RDMA, the resulting NIC team does NOT support RDMA. Given how Windows 8 SMB 2.2 natively supports RDMA without modifying applications, it is a bad idea to team NICs with RDMA capabilities, and where the interconnect (routers, etc) also supports RDMA
How to:
Using Powershell:
- Static
New-NetLbfoTeam -Name “Team-Static” -TeamMembers NIC1,NIC2 -TeamingMode Static
- Dynamic
New-NetLbfoTeam -Name “Team-Static” -TeamMembers NIC1,NIC2 -TeamingMode Lacp
- Switch Independent
New-NetLbfoTeam -Name “Team-Independent” -TeamMembers NIC1,NIC2 –TeamingMode SwitchIndependent
More Power Shell Commands:
- To get the Teaming proprieties and settings in PowerShell:
Get-NetLbfoTeam
- To get all of the PowerShell commands available for NetLBFO
Get-Command -Module NetLbfo
Using GUI:
- Open Server Manager.
- In the console tree, click Local Server.
- In the details pane, in the Properties section, click NIC Teaming Administration under Remote Desktop.

- In the NIC Teaming Window, select the NIC’s to team on the bottom right on the screen
- Right click and select add to new team

- In the new team window, provide the name of the nic team(e.g. team-static)
- Expand the additional properties and select the team mode

- click OK to finalise and create the nic team.


Now you are ready to create the Hyper-v Network Switch by using the NIC team.
Recommended Books


System Center 2012 R2 Virtual Machine

System Center Virtual Machine Manager 2012 Cookbook

