Hyper-V and Jumbo Frames in 3 steps
As we start working with 10GB nic’s and Hyper-V There are 3 required steps necessary to ensure JUMBO FRAMES proper configuration:
Important to understand: Jumbo Frames needs to be enable from end to end to work properly.
– Enable JUMBO FRAMES in all physical hardware that are interconnected : switches, storage and servers. They must support jumbo packets and this feature must be enabled. Note: Almost all switches requires a reboot after jumbo frames have been configured.

– Enable JUMBO FRAMES in the Hyper-V’s virtual switch. Hyper-V’s virtual switches are no different than any other TCP/IP implementation.
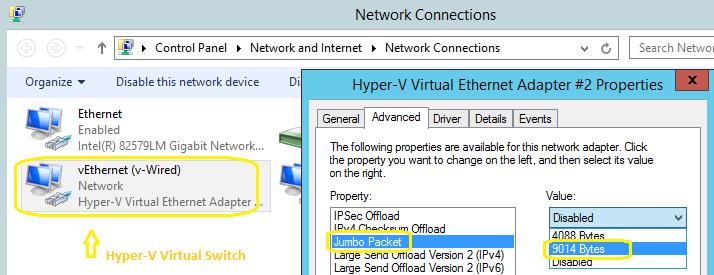
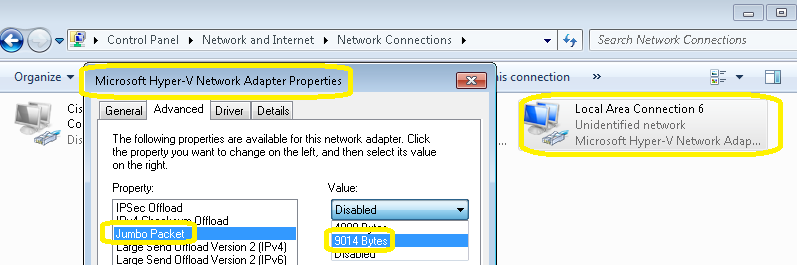
-Enable JUMBO FRAMES inside the VM (Guest OS). You can use PowerShell or use the GUI in Windows 2012 R2:
After the reboot you can test jumbo frames.
Use the ping command to test it, pinging from the VM to the switch for example.
eg. ping -f -l 8000 10.1.1.200
Notes:
The -f parameter does not allow packets to be fragmented.
The -l parameter specifies the size of the packet.
Also remember to enable VMQ to improve performance But it DOES help to reduce CPU cycles in that case
-
February 12, 2014 at 04:09Dell TechCenter
-
February 12, 2014 at 04:10Windows Management
Recommended Books


System Center 2012 R2 Virtual Machine

System Center Virtual Machine Manager 2012 Cookbook

