Archive
Installing Windows 2008 R2 with Hyper-v in Core version
Steps that you need to use to install and configure the Hyper-V on a Windows 2008 Core
Note the following:
- There is no way to upgrade from a previous version of the Windows Server operating system to a Server Core installation. Only a clean installation is supported.
- There is no way to upgrade from a full installation of Windows Server 2008 to a Server Core installation. Only a clean installation is supported.
- There is no way to upgrade from a Server Core installation to a full installation of Windows Server 2008. If you need the Windows® user interface or a server role that is not supported in a Server Core installation, you will need to install a full installation of Windows Server 2008.
Compare Server Core Installation Options
|
Server Role |
Enterprise |
Datacenter |
Standard |
Web |
Itanium |
|---|---|---|---|---|---|
|
Active Directory Domain Services |
|
|
|
|
|
|
Active Directory Lightweight Directory Services |
|
|
|
|
|
|
DHCP Server |
|
|
|
|
|
|
DNS Server |
|
|
|
|
|
|
File Services |
|
|
|
|
|
|
Hyper-V |
|
|
|
|
|
|
Print Services |
|
|
|
|
|
|
Web Services (IIS)* |
|
|
|
|
|
· Enable CPU virtualisation assistance and DEP in the BIOS.
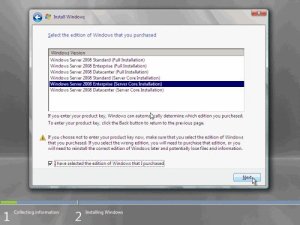
· Install Windows Server 2008 Enterprise x64 (Core Installation).
· Determine the NIC ID: netsh interface ipv4 show interfaces.
· Set the IP address for NIC, let say for NIC #2:
netsh interface ipv4 set address name=”2″ source=static address=192.168.1.20 mask=255.255.255.0 gateway=192.168.1.1
· Set the DNS: netsh interface ipv4 add dnsserver name=”2″ address=192.168.1.2 index=1.
· Rename server: netdom renamecomputer %computername% /NewName:HyperSvr1.
· Reboot for that to take effect: shutdown /r /t 0.
· Join it to domain: netdom join %computername% /domain:CONTOSO /userd:administrator /passwordd:*.
· Reboot for that to take effect: shutdown /r /t 0.
· Install the Hyper-V update: wusa.exe Windows6.0-KB950050-x64.msu.
· Reboot.
· Install the Hyper-V role: start /w ocsetup.exe Microsoft-Hyper-V.
· Reboot.
· Disable the firewall netsh firewall set opmode mode=disable
1. On the server running a Server Core installation, type the following command at a command prompt:
cscript C:WindowsSystem32Scregedit.wsf /ar 0
This enables the Remote Desktop for Administration mode to accept connections.
BTW, in order to view your current settings you can type:
cscript C:WindowsSystem32Scregedit.wsf /ar /v
If you see "1" in the script output, that means that RDP connections are denied. If you see a "0", they will be allowed.
Note: If you are running the Terminal Services client on a previous version of Windows, you must turn off the higher security level that is set by default in Windows Server 2008. To do this, type the following command at the command prompt:
cscript C:WindowsSystem32Scregedit.wsf /cs 0
To enable remote management from an RDP connection through the firewall
1. To enable remote management from any MMC snap-in, type the following:
netsh advfirewall firewall set rule group="Remote Desktop" new enable=yes (you may have already done this step)
To open an RDP session with the Server Core machine
1. On the remote management computer, click Start > Run, type mstsc, and then click OK.
2. In Computer, enter the name of the server running a Server Core installation, and click Connect.
3. Log on using an administrator account.
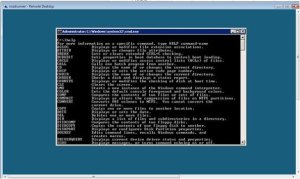
4. When the command prompt appears, you can manage the computer using the Windows command-line tools.
Note that while you’re logged on to the server, the original server console session is locked out.
5. When you have finished remotely managing the computer, type logoff in the command prompt to end your Terminal Server session.
Also, from the command line of the Server Core box, type: c:windowssystem32cscript scregedit.wsf /cli for a listing of all the command line references
Determining if your machine is ready for Windows 2008 R2 and/or Hyper-V
|

Windows 7 Virtual Roundtable Q&A: Part One
Q: When will the Automated Installation Kit (AIK) fully support Windows 7?
- A: There is a beta of the Windows AIK for Windows 7 that you can download today from http://technet.microsoft.com/library/dd349343.aspx.
- A: Yes, you will be able to unlock and read from BitLocker files on Windows XP and Windows Vista.
- A: MDT 2010 is currently in beta, and can be downloaded from https://connect.microsoft.com/site/sitehome.aspx?SiteID=14.
- A: The kernel consists of many different files; it is updated with Windows 7, but is based on the same underlying architecture.
- A: ReadyBoost in Windows 7 adds support for concurrently using multiple flash devices (such as USB keys, Secure Digital cards, and internal flash devices) and for caches larger than 4 GB. ReadyBoost supports exFAT, FAT32, and NTFS file systems.
- A: No. Group Policy settings are independent of Group Policy Preferences. There is no 1:1 relationship between them in Windows 7.
- A: AppLocker is not dependent on a specific version of Windows Server. You can manage AppLocker from a Windows 7 client using the Group Policy Management Console (GPMC) that ships in the Remote Server Administration Tools (RSAT) for Windows 7, which is currently in Bet. You can download the beta here.
- A: Since Windows Vista and Windows 7 share similar design frameworks, there is a foundation for application compatibly. Since Windows XP has a different framework, the levels of application compatibility are not the same.
- A: Yes. Double-click an ISO, and Windows 7 opens a minimalistic dialog. Choose a burner, select whether or not to verify your burn, and burn/cancel.
- A: The Beta and RC are, and will be, supported via the Windows 7 Forums at http://social.technet.microsoft.com/Forums/en/category/w7itpro.
- A: Yes. We plan on releasing an update to the Application Compatibility Toolkit (ACT) in April to support Windows 7 pre-releases. There will also be a version corresponding with Windows 7 release to manufacturing (RTM).
- A: There will be a version of the Application Compatibility Toolkit to support Windows 7 available in the April 2009 timeframe. Additionally, the Windows system application compatibility fix (shim) database is constantly extended with each Windows release milestone.
- A: For individual use, Windows Easy Transfer can be used to gather files and settings from your computer and save to an external location. For organizational use, the User State Migration Tool (part of the Windows Automated Installation Kit) can also perform in-place user profile migration using Hard-link Migration along with a clean operating system install.
- A: Deployment Image Servicing and Management (DISM) supports Windows 7 client and Windows Server 2008 R2. DISM also leverages an included shim for Package Manager (pkgmgr.exe) to enable DISM to perform Package Manager commands against Windows Vista or Windows Server 2008 images.
- A: In working to improve performance for startup we have focused on making improvements in the following areas:
- The efficiency of core Windows code
- Only starting certain services when they are needed (demand-start services)
- The way device drivers are initialized
- Allowing multiple device drivers to start at the same time (parallelization)
- An overall reduction in the memory and CPU required to start and run the graphics system
- A: Microsoft has invested in PerfTrack, an automated reporting feature in Windows that tracks the performance of over 400 experiences on the PC. Windows 7 also includes troubleshooters such as IE Performance as well as a Check for Performance Issues to help users check for performance issues over time.
- A: Detailed guidance for creating Boot from VHD files is currently being created. The basic process is to create a virtual disk using diskpart.exe, attach the virtual disk using diskpart.exe, use ImageX to apply a System-Prepared Generalized Windows Imaging (WIM) file to the attached virtual disk, then detach the virtual disk using diskpart.exe. After the VHD file is created, add an entry into the boot loader using bcdedit.exe to point to the file location of the VHD file. This only works with Windows 7 Enterprise and Ultimate editions and Windows Server 2008 R2 VHD files.
- A: Most tools are retained from Windows Vista. Deployment Image Servicing and Management consolidates functions of IntlConfig, PEImg and PkgMgr in the Windows AIK for Windows 7. DISM supports PkgMgr functions against Windows Vista and Windows Server 2008 images. Integrated tools like the Microsoft Deployment Toolkit and System Center Configuration Manager 2007 will also support Windows 7 and Windows Server 2008 R2 deployment.
- A: Yes. There is a two-part blog post on this subject on the Springboard Series Blog (Part 1 | Part 2) and a deployment overview guide available at http://technet.microsoft.com/library/dd367841.aspx.
- A: There are two common approaches. You can pre-partition the drive for BitLocker, install the operating system, and enable BitLocker via deployment task sequence. Or, you can run the BitLocker Drive Preparation tool post-install and enable BitLocker via deployment task sequence. The default installation of Windows 7 will automatically create the BitLocker partition at install time.
Published 09 March 09 08:49 AM | Celine Allee
http://blogs.technet.com/springboard/archive/2009/03/09/windows-7-virtual-roundtable-q-a-part-one.aspx
Recommended Books


System Center 2012 R2 Virtual Machine

System Center Virtual Machine Manager 2012 Cookbook

