Installing Windows 2008 R2 with Hyper-v in Core version
Steps that you need to use to install and configure the Hyper-V on a Windows 2008 Core
Note the following:
- There is no way to upgrade from a previous version of the Windows Server operating system to a Server Core installation. Only a clean installation is supported.
- There is no way to upgrade from a full installation of Windows Server 2008 to a Server Core installation. Only a clean installation is supported.
- There is no way to upgrade from a Server Core installation to a full installation of Windows Server 2008. If you need the Windows® user interface or a server role that is not supported in a Server Core installation, you will need to install a full installation of Windows Server 2008.
Compare Server Core Installation Options
|
Server Role |
Enterprise |
Datacenter |
Standard |
Web |
Itanium |
|---|---|---|---|---|---|
|
Active Directory Domain Services |
|
|
|
|
|
|
Active Directory Lightweight Directory Services |
|
|
|
|
|
|
DHCP Server |
|
|
|
|
|
|
DNS Server |
|
|
|
|
|
|
File Services |
|
|
|
|
|
|
Hyper-V |
|
|
|
|
|
|
Print Services |
|
|
|
|
|
|
Web Services (IIS)* |
|
|
|
|
|
· Enable CPU virtualisation assistance and DEP in the BIOS.
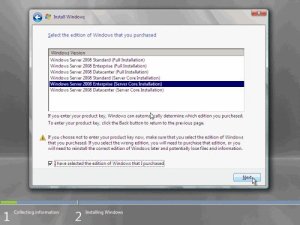
· Install Windows Server 2008 Enterprise x64 (Core Installation).
· Determine the NIC ID: netsh interface ipv4 show interfaces.
· Set the IP address for NIC, let say for NIC #2:
netsh interface ipv4 set address name=”2″ source=static address=192.168.1.20 mask=255.255.255.0 gateway=192.168.1.1
· Set the DNS: netsh interface ipv4 add dnsserver name=”2″ address=192.168.1.2 index=1.
· Rename server: netdom renamecomputer %computername% /NewName:HyperSvr1.
· Reboot for that to take effect: shutdown /r /t 0.
· Join it to domain: netdom join %computername% /domain:CONTOSO /userd:administrator /passwordd:*.
· Reboot for that to take effect: shutdown /r /t 0.
· Install the Hyper-V update: wusa.exe Windows6.0-KB950050-x64.msu.
· Reboot.
· Install the Hyper-V role: start /w ocsetup.exe Microsoft-Hyper-V.
· Reboot.
· Disable the firewall netsh firewall set opmode mode=disable
1. On the server running a Server Core installation, type the following command at a command prompt:
cscript C:WindowsSystem32Scregedit.wsf /ar 0
This enables the Remote Desktop for Administration mode to accept connections.
BTW, in order to view your current settings you can type:
cscript C:WindowsSystem32Scregedit.wsf /ar /v
If you see "1" in the script output, that means that RDP connections are denied. If you see a "0", they will be allowed.
Note: If you are running the Terminal Services client on a previous version of Windows, you must turn off the higher security level that is set by default in Windows Server 2008. To do this, type the following command at the command prompt:
cscript C:WindowsSystem32Scregedit.wsf /cs 0
To enable remote management from an RDP connection through the firewall
1. To enable remote management from any MMC snap-in, type the following:
netsh advfirewall firewall set rule group="Remote Desktop" new enable=yes (you may have already done this step)
To open an RDP session with the Server Core machine
1. On the remote management computer, click Start > Run, type mstsc, and then click OK.
2. In Computer, enter the name of the server running a Server Core installation, and click Connect.
3. Log on using an administrator account.
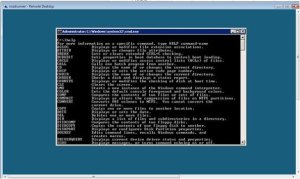
4. When the command prompt appears, you can manage the computer using the Windows command-line tools.
Note that while you’re logged on to the server, the original server console session is locked out.
5. When you have finished remotely managing the computer, type logoff in the command prompt to end your Terminal Server session.
Also, from the command line of the Server Core box, type: c:windowssystem32cscript scregedit.wsf /cli for a listing of all the command line references
Recommended Books


System Center 2012 R2 Virtual Machine

System Center Virtual Machine Manager 2012 Cookbook

