Archive
Virtualization : Domain Controllers How to resolve Event ID 2095
If the Directory Service event log reports Event ID 2095. Here is how to fix the issue:
-
Shut down the domain controller virtual machine that recorded the error, and ensure that it does not restart.
-
Determine whether a snapshot of the domain controller was recently used as a restore mechanism. If so, this is most probably the source of the error.
-
Attempt to determine whether any changes originated from this domain controller and propagated to other domain controllers. If the event was a result of a snapshot or copy of a virtual machine being started, try to determine the time the USN rollback occurred. You can then check the replication partners of that domain controller to determine whether replication occurred since then.
You can use the Repadmin tool to make this determination. For information about how to use Repadmin, see Monitoring and Troubleshooting Active Directory Replication Using Repadmin (http://go.microsoft.com/fwlink/?LinkId=122830). If you are not able to determine this yourself, contact Microsoft Customer Service and Support (http://go.microsoft.com/fwlink/?LinkID=102491) for assistance.
-
Forcefully demote the domain controller. This involves cleaning up the domain controller’s metadata and seizing the operations master (also known as flexible single master operations or FSMO) roles. For more information, see the “Recovering from USN rollback” section of article 875495 in the Microsoft Knowledge Base (http://go.microsoft.com/fwlink/?LinkID=137182).
-
Delete all former VHD files for the domain controller.
Virtualization : Time Service Syncronization
For virtual machines that are configured as domain controllers, disable time synchronization with the host through Integration Services. Instead, accept the default Windows Time service (W32time) domain hierarchy time synchronization.
Host time synchronization makes it possible for guest operating systems to synchronize their system clocks with the system clock of the host operating system. Because domain controllers have their own time synchronization mechanism, host time synchronization must be disabled on virtual machines that are configured as domain controllers. If domain controllers synchronize time from their own source and also synchronize time from the host, the domain controller time can change frequently. Because many domain controller tasks are tied to the system time, a jump in the system time could cause lingering objects to be left in the directory and replication to be stopped.
You can disable host time synchronization in the virtual machine settings in the Integration Services section of the Hyper-V Manager by clearing the Time Synchronization check box.
Virtualization deployment practices to avoid
Virtualization platforms, such as Hyper-V, offer a number of convenience features that make managing, maintaining, backing up, and migrating computers easier. However, there are some common deployment practices and features that should not be used for virtual domain controllers. The following list describes the practices to avoid when you deploy domain controllers:
- Do not implement differencing disk virtual hard disks (VHDs) on a virtual machine that you are configuring as a domain controller. This makes it too easy to revert to a previous version, and it also decreases performance. For more information about VHD types, see New Virtual Hard Disk Wizard (http://go.microsoft.com/fwlink/?LinkID=137279).
- Do not clone the installation of an operating system without using Sysprep.exe because the security identifier (SID) of the computer will not be updated. For more information about running the System Preparation tool (Sysprep), see "Using virtual hard disks" in Ways to deploy an operating system to a virtual machine (http://go.microsoft.com/fwlink/?LinkId=137100).
- To help prevent a potential update sequence number (USN) rollback situation, do not use copies of a VHD file that represents an already deployed domain controller to deploy additional domain controllers. The next three items in this list are also recommended to help avoid potential USN rollback. For more information about USN rollback, see Appendix A: Virtualized Domain Controllers and Replication Issues.
- Do not use the Hyper-V Export feature to export a virtual machine that is running a domain controller
Processor Compatibility new feature of Windows 2008 R2
When a running virtual machine is moved to a server running different processor, the virtualization platform needs to provide necessary support to ensure applications running inside virtual machines continue to run on the destination processor.
The Processor Compatibility new feature of Windows 2008 R2, enables Live Migration to occur between processors at different versions/generations/steppings.
A particular Intel or AMD class of processors exists in a family. That family has multiple generations, or steppings, that define one set of processors from another. While these differences are relatively unnoticeable for most of us during our usual use of the OS, they can be enough to prevent a Live Migration from successfully occurring. The "differences" actually arrive as different processor capabilities that are baked into the chip itself.
This new feature enables the masking of these features so that a running virtual machine can successfully Live Migrate from one host to another. The result is that you must no longer be exactly equal in processor capabilities between multiple hosts. The best part is that the majority of this functionality is kept underneath the covers.
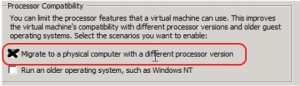
You only need to check if the box "Migrate to a physical computer with a different processor version" is marked for each VM. That’s it. The Live Migration process will eliminates concerns and conflicts and process the migration sucessfully
Scenarios
1. You have a virtual machine running on a host A and would like to be able to move it to another host B
2. You buy another server and add to the cluster. The newly added server is most likely has newly added processor features than other hosts in the cluster. You would like to be able to move running virtual machines freely from any node of the cluster.
3. You have a virtual machine running on host A, You save the VM with active memory state and would like to restore the same at a later date on any Hyper-V enabled host which may not be the same host.
How it works:
With processor compatibility mode enabled, Hyper-V only exposes the guest VM to processor features that are available across all processors of the same processor architecture, i.e. AMD-to-AMD or Intel-to-Intel. This allows the VM to be migrated to any hardware platform of the same processor architecture. Processor features are “hidden” by the Hypervisor by intercepting a VM’s CPUID instruction and clearing the returned bits corresponding to the hidden features.
When a VM in a processor compatibility mode is started following processor features are hidden from the VM:
Host running AMD based processor
SSSE3, SSE4.1, SSE4.A, SSE5, POPCNT,
LZCNT, Misaligned SSE, AMD 3DNow!,Host running Intel based processor
SSSE3, SSE4.1, SSE4.2, POPCNT, Misaligned
SSE, XSAVE, AVX
Also, VM’s cache line flush size is set to 8 bytes on AMD and Intel based hosts when in processor compatibility mode.
Important : Windows Server 2008 R2 Hyper-V will not allow migrating a VM (with or without in processor compatibility mode) from AMD based hosts to Intel based hosts, and vice versa.
VM’s processor compatibility mode is OFF by default. It can be turned on by one of the two ways:
1. Using Hyper-V Manager: from Hyper-V Manager, select CPU setting wizard of the VM.
Check a check-box labeled “Migrate to physical computer with a different processor version. You can only change this setting when VM is not running.
2. Using System Center Virtual Machine Manager 2008 R2
Notes :
1. Moving down to older processer versions consider potential performance reduction due to loss of processor features which might accelerate applications performance. It’s recommended that you properly test these scenarios.
2. An application may use non-recommended methods for processor feature detection, such as instruction probing, i.e. using an exception handler and attempting to execute a feature’s instruction to determine the presence of a feature. Or, basing feature presence on the type of processor, i.e. family, model and stepping.
3. Applications may fail to launch because of the lack of a specific a processor feature It is recommended that before deploy
Windows Server 2008: Failover Clustering with iSCSI, using Starwind
Creating a failover cluster with iSCSI disks is simple
First, make sure that the software that you are start using have support for persistent reservations by your iSCSI target.
Windows Server 2008 has a Cluster Validation tool that will tell you if your configuration is supported and it’s working. The validation tool is part of the Failover Cluster Management console that will be available to you when you install the Failover Clustering feature.
I am using the RocketDivision’s StarWind iSCSI Target for Microsoft Windows. The iSCSI target works fine with Microsoft’s iSCSI Initiator in Windows Server 2008 and it supports everything that is needed to create a failover cluster.
I installed the iSCSI target server on a Windows 2008 Server x64.
1. Start Creating the file-backed iSCSI disks using the mkimage.exe tool (part of StarWind). You create a disk file with the following command:
mkimage -sparse c:sanimage.img 127G
2. Now publish it so you can connect to them using iSCSI. You do this by editing the starwind.cfg file (in c:program filesrocket division softwarestarwind).
3. In the <devices> section, add the following:
<device name="ImageFile0" file="c:sanimage.img" asyncmode="yes" clustered="yes"/>
4. Save the file
5. Stop / Start the StarWind service.
6. Now you can configure the disk on Windows Server 2008
a) Open Control Panel.
b) Double click the iSCSI Initator icon and answer the questions that come (to start the service etc…).
c) In iSCSI Initator properties:
· In the Discovery tab, add the target portal (where the StarWind is installed).
· In the Targets tab, click Refresh. You should see the iSCSI targets offered by StarWind. Click each target and click the Log on… button. Make sure you set the option to automatically restore the connection when the computer starts.
d) click OK to close iSCSI Initiator properties
e) In Disk Management (diskmgmt.msc) you should see an extra disk (not initialized yet)
f) Make sure that the Failover Clustering feature is installed on each node ( server ) : from Server Manager, select Features and then click Add Features.
g) Select the Failover Clustering feature.
h) After installing the Failover Clustering feature, you can start Failover Cluster Management from Start / Administrative Tools.
i) You can now create the cluster and add services and applications.
j) Atention: if you do not initialize the disk, the cluster will be created as a Node Majority cluster and not as a Node and Disk Majority cluster. To create a Node and Disk majority cluster, on one node, initialize and format the iSCSI disk as NTFS.
disabled network re-enabled after installing Windows 2008 SP2
To disable the virtual network adapter in a full installation of Windows Server 2008, follow these steps:
- Open Network and Sharing Center in Control Panel.
- Click Manage Network Connections.
- On the View menu, click Details.
- Double-click the appropriate virtual network adapter in the Name column.
Note In a default installation, this is the name of the External Virtual Network that was created by Virtual Network Manager in Hyper-V Manager.
- Click Disable.
To disable the virtual network adapter in a server core installation of Windows Server 2008, open a command prompt, and then type the following commands. Press ENTER after each command.
netsh interface show interfacenetsh interface show interface "InterfaceName" disabled
Introducing SCONFIG for Windows Server 2008 R2 Core Deployments
I really like the Core version and Microsoft is helping us a lot with some usefull comands/scripts.
MS announced that in Windows Server 2008 R2, there’s an easy to use CLI, SCONFIG. SCONFIG dramatically eases server configuration for Windows Server 2008 R2 core deployments. With SCONFIG, you can easily set your system up, get it on the network so you can easily manage the server remotely.
- Rename your computer? Press 2 and you will be prompted to type in the computer name.
- Domain join? Press 1 and you’ll be prompted for name & password.
Simple, EASY and fast.
With SCONFIG you can easily have a Windows Server 2008 R2 Server Core deployment setup in minutes. I should also mention that SCONFIG is also localized in almost 20 languages.
Tasks include:
- Domain join
- Rename Computer
- Configure Remote (Enable management via Server Manager, & PowerShell including properly configuring the firewall.)
- Configuring Windows Update
- Enabling Remote Desktop (in case you want to login remotely.)
- Configuring Networking (static vs. DHCP and for multiple NICs)
- and more….
All you have to do is type sconfig at the command line.

New IBM tools for Microsoft Virtualisation
For those who use IBM hardware, there is some great news today. IBM has released the Microsoft Assessment Planning Tool for IBM, which is based on the existing Microsoft Assessment Planning Tool. This tools provides specific guidance on how to consolidate and virtualize workloads on IBM System x and BladeCenter servers. If you use IBM systems, you should check this out. You can get the tool from
Note, this page is full of IBM resources for Microsoft Systems Management Solutions, including IBM PRO packs for Virtual Machine Manager.
Ofiice DevCon : University Of Queensland (St. Lucia campus : 31st October-1st November
Office DevCon is the largest and most popular annual community-driven conference that allows Microsoft Office developers and power users to come together in one location to hear expert speakers present on a wide range of Microsoft Office-related topics.
2009 will be our third year, and we are planning to build on the unprecedented success of the first two years.
Come along and discover how to do things you never knew you could do with the Microsoft Office suite of products
Where and when?
This year, Office DevCon will be held at: University Of Queensland (St. Lucia campus) 31st October-1st November
What will be covered?
![]()
We have Microsoft and industry experts from around the world who will present advanced topics the following products.
- Access
- Word
- Excel
- PowerPoint
- InfoPath
- Groove
- SharePoint
- and more….
click here for more details
See you there….
Hyper-V and VM time drift adding the “/usepmtimer”
Dual Core or multiprocessor AMD Opteron processors may encounter Time Stamp Counter (TSC) drift in certain conditions when time precision is important
Whether the system is affected by this issue depends on the specific ProLiant server generation, the number and type of AMD Opteron processors installed, the operating system, and whether AMD’s PowerNow! feature is being utilized.
This condition affects operations such as network communications and performance monitoring tasks that are sensitive to system time. For example, Microsoft Active Directory domain controllers can report an Unexpected Network Error (Event ID 1054).
Event Description: Windows cannot obtain the domain controller name for your computer network. (An unexpected network error occurred ) . Group Policy processing aborted.
In addition, a negative PING time may be returned after issuing the PING command. The negative PING time occurs because of a Time Stamp Counter drift occurring on AMD Opteron platforms which include more than one processor core.
You may also see that the performance monitor shows you wrong values.
Cause
Many operating systems use the TSC as a timekeeping source. Each processor core (whether it is a single-core processor or dual-core processor) includes a TSC. When the TSC for different processor cores are not synchronized, the above symptoms and behaviors can occur if the operating system is using the TSC as a timekeeping source
Resolution
Edit the BOOT.ini file and add the parameter "/usepmtimer", then reboot the server. Adding the "/usepmtimer" parameter to the BOOT.INI file configures the Windows operating system to use the PM_TIMER, rather than the Time Stamp Counter.
Note: When installing the latest AMD PowerNow! Technology driver from AMD, the BOOT.INI file will automatically be updated with the “/usepmtimer” parameter. While the driver itself does not resolve this issue, the installation process will make the necessary changes to the BOOT.INI file to prevent the issue from occurring.
Unless you are running SP2 for W2K3 (where we use the PM timer for MP APIC ACPI HALs by default now), you must force the use of the PM timer on AMD machines via the /USEPMTIMER switch. The decision to use the PM timer versus the TSC is actually a check done on boot to query the BIOS, and determine whether or not it will properly support the PM timer functions – this check is not 100% accurate on AMD chipsets, and that is why forcing /USEPMTIMER is required. This section of code was rewritten for W2K3 SP2, and you should see the proper performance monitor data on AMD chipsets with SP2 installed without the use of the /USEPMTIMER switch.
The document from AMD in the below link also explains the above problem
http://developer.amd.com/Assets/TSC_Dual-Core_Utility.pdf
http://developer.amd.com/Pages/1214200692.aspx
Recommended Books


System Center 2012 R2 Virtual Machine

System Center Virtual Machine Manager 2012 Cookbook

